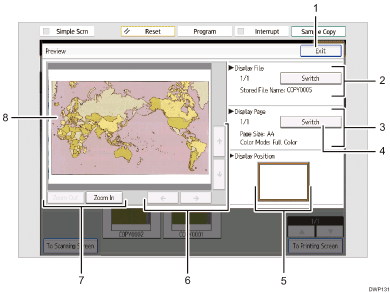
This section explains the items that appear on the [Preview] screen and how to preview stored documents.
The [Preview] screen denotes the screen that allows confirming contents of the scanned documents.
To preview stored documents, select the documents you want to preview on the file list screen, and then press [Preview].

[Exit]
Closes the preview display.
Display File
Displays the file name.
If you have selected two or more files for preview, press [Switch] to switch between them.
Display Page
Displays the number of the currently displayed page, total number of pages, page size, and color mode.
[Switch]
Flips the page of the selected file.
Display Position
Indicates the location of the displayed preview image when the image is enlarged.
[
 ][
][ ][
][ ][
][ ]
]Moves the display area in the direction indicated by the arrow.
[Zoom Out] and [Zoom In]
Scales the displayed page down or up.
Preview image
Displays a preview of scanned documents. Double-tapping the image allows you to enlarge and display it at the original magnification. The position where you tapped the image is displayed in the center of the preview area when the preview image is magnified.

When the preview is already selected from another function, the preview screen function may become unusable.
The preview display is also not available when the paper size is larger than A3 or if the image file is corrupt. If the image file is corrupt, store it again.
