Be sure not to load the original untidily. Doing so may cause the machine to display a paper misfeed message. Also, be sure not to place originals or other objects on the top cover. Doing so may cause a malfunction.
![]() Adjust the original guide to the original size.
Adjust the original guide to the original size.
![]() Place the aligned originals squarely face up in the ADF.
Place the aligned originals squarely face up in the ADF.
Do not stack originals beyond the limit mark.
The first page should be on the top.
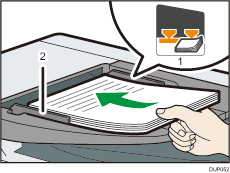
Limit mark
Original guides
![]()
Align the original guide with the original. Otherwise, the original may be scanned at a skew.
Straighten curls in the originals before placing them in the ADF.
To prevent multiple sheets from being fed at once, fan the original before placing it in the ADF.
Take care to place originals after any correction fluid and ink has completely dried. Not taking this precaution could cause marks on the exposure glass that will be scanned.
The machine cannot detect the size of the original automatically. Specify the original size. For details about how to specify the original size, see the following:
"Specifying the Original Size", Copy
"Specifying the Scan Size", Scan
"Specifying the Scan Size", Fax (for SP C360SFNw/C361SFNw)
For details about the sizes and weights of originals that you can place in the ADF, see Supported Original Sizes and Weights.
If the machine stops operating because of a power failure or unplugging of the power cable while the ADF is in use, be sure to follow the procedure below to check if the original is left inside the machine and remove it before turning the power on.
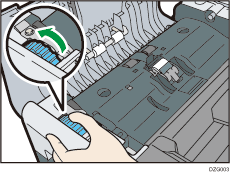
Open the ADF cover and turn the blue jammed paper removal dial counterclockwise five or more times.
The jammed original comes out to the output tray. Keep on turning the dial until the original comes out completely and can be removed.