Load one original at a time. Be sure not to load an original into the ID Card Feeder when scanning using the ADF or exposure glass.
![]()
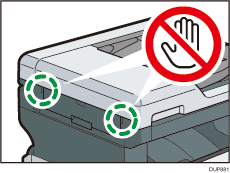
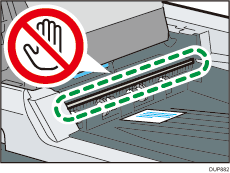
Be sure not to touch the parts indicated in the illustration below when scanning using the ADF and ID Card Feeder. Doing so may cause static electricity and image noise.
![]() Adjust the original guide to the original size. Place the original face down into the ID Card Feeder.
Adjust the original guide to the original size. Place the original face down into the ID Card Feeder.
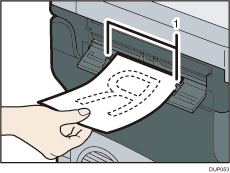
Original guides
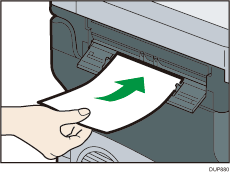
![]() Insert the original until it stops in the ID Card Feeder.
Insert the original until it stops in the ID Card Feeder.
![]()
To avoid damaging the originals, perform the following procedure when you want to abort scanning and remove the originals set in the ID Card Feeder.
Open the ADF cover.
Turn the jammed paper removal dial clockwise.
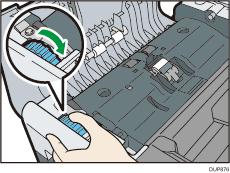
Remove the card or paper.
Be sure not to insert the next original in the ID Card Feeder while the machine is scanning an original using the ID Card Feeder or ADF.
Take your hand off the original as soon as the ID Card Feeder starts feeding it. If you keep holding the original, the original may be jammed.
Be sure not to touch the parts indicated in the illustration below while scanning the original. Doing so may cause static electricity and image noise.
For information on using the ID Card Feeder, see "Original Orientation", Copy, or "Placing Originals", Scan.
Straighten curls in the originals before placing them in the ID Card Feeder, or use Carrier Sheet Type P14.
Take care to place originals after any correction fluid and ink has completely dried. Not taking this precaution could cause marks on the exposure glass that will be scanned.
The machine cannot detect the size of the original automatically. Specify the original size. For details about how to specify the original size, see the following:
"Specifying the Original Size", Copy
"Specifying the Scan Size", Scan
"Specifying the Scan Size", Fax (for SP C360SFNw/C361SFNw)
For details about the sizes and weights of originals that you can place in the ID Card Feeder, see Supported Original Sizes and Weights.
For details about the originals you cannot load into the ID Card Feeder, see page 169 "Non-compatible originals for the Auto Document Feeder". However, you can load the following originals into the ID Card Feeder using Carrier Sheet Type P14:
Originals with any kind of coating such as thermal paper, art paper, aluminum foil, carbon paper, or conductive paper
Curled, folded, or creased at the leading edge, or also at the tailing edge when scanning in 2-sided mode
Originals with perforated lines or punched holes larger than a diameter of 9 mm (0.35 inches)
Perforated or torn originals
Curled originals
Stapled or clipped originals (when the original's thickness with the staples or clips included is 0.8 mm (0.03 inches) or less)
Originals with adhesive tape, glue or paste stuck to them
Curled, folded, or creased originals
2-sided originals written in pencil or carbon
Strongly waved originals
Pasted originals
You cannot load non-paper originals except for plastic ID cards and carrier sheets.
