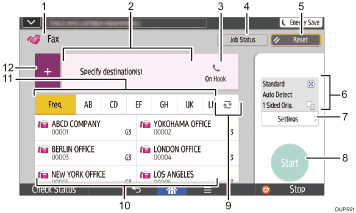
This section describes the [Fax] screen and its functions.
No. |
Function |
Description |
|---|---|---|
1 |
|
Only fax transmission is available for this machine. |
2 |
Specify Destination(s) |
The specified destination is shown here. By tapping the destination, you can register it to the Address Book or remove it from the destinations. By flicking up and down, you can confirm the selected destinations. |
3 |
|
This function allows you to dial while listening to the dial tone from the internal speaker with the handset of the machine or external telephone on-hook. |
|
The total number of the selected destinations appears. Press to display a screen to confirm destinations. In the screen to confirm destinations, you can do the following:
|
|
4 |
Job Status |
You can perform the following operations related to Job Status:
|
5 |
Reset |
Press to clear your current settings. |
6 |
Current Settings |
You can check the settings in [Settings]. |
7 |
Settings |
Press to open the settings screen. |
8 |
Start |
Press to scan originals and start sending. |
9 |
|
Press to switch the section of the Address Book. |
10 |
Destination keys |
Shows the destinations in the Address Book. |
11 |
Address Tab |
Press the title word key where the desired destination is programmed. For example, if you want to specify "New York Office", press [LMN]. |
12 |
|
Press to add a destination. Destinations can be added as follows:
|
![]()
If you specify many destinations, the machine might require some time to start scanning originals after [Start] is pressed.
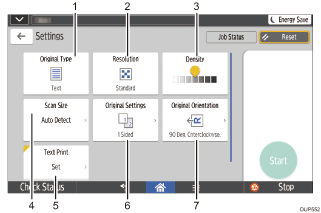
[Settings] screen
No. |
Function |
Description |
|---|---|---|
1 |
Original Type |
You can select an original type that is suitable for your originals. |
2 |
Resolution |
Press to select the resolution according to the size of the text on your original. |
3 |
Density |
Press to specify the density to scan the original. You can also specify the density by touching the |
4 |
Scan Size |
Press to select the scanning size of the original. |
5 |
Text Print |
You can specify the fax header to be printed. |
6 |
Original Settings |
Press to select the sides of the original to scan, such as one side or both sides. |
7 |
Original Orientation |
Press to select the orientation of the original. |