Depending on the cause of the problem, do one the following:
The side fences in the paper tray are too far apart.
If the side fences are too far apart, the paper may be skewed.
Adjust the side fences to match the paper width.
When you close the paper tray, the side fences may become misaligned due to the weight of the paper.
To prevent this, close the paper tray slowly.
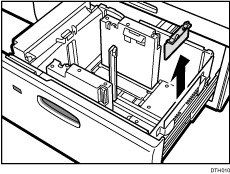
For details about loading paper, see "Loading Paper", About This Machine.
The paper size/orientation/type is not specified correctly.
In tray paper settings, specify the size, orientation, and type of the paper in use.
For details about tray paper settings, see "Changing Tray Paper Settings", Paper Settings.
This problem occurs when the two-tray wide LCT is used.
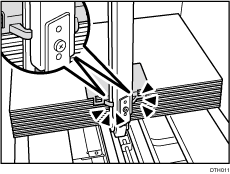
For paper of thickness of zero and smaller than A5 size, take the following steps:
Remove the tab fence (small) from the pocket on the right side of the paper tray, and set the tab fence.
Align the side fence with the paper size, and place the paper.
Attach the tab fence (small), and then align the end fence gently against the paper you loaded while pressing the release button of the end fence.
![]()
Replace the tab fence (small) after use.
Colored paper or transparencies are loaded in the paper tray.
Paper edges may not have been detected correctly.
Adjust the color paper edge detection.
In [Advanced Settings] for the custom paper in use, select [Color Paper Edge Detection Adjustment] and make a note of the present value.
Increase the value in [Color Paper Edge Detection Adjustment].
Print the image. Is the problem resolved?
Yes
Finished!
No
Keep increasing the value until the problem is resolved.
If the problem persists even though the setting has reached its maximum value, restore the value noted in step 1 and go to the next step.
Decrease the value in [Color Paper Edge Detection Adjustment].
Print the image. Is the problem resolved?
Yes
Finished!
No
Keep decreasing the value until the problem is resolved.
If the problem persists even though the setting has reached its minimum value, restore the value noted in step 1 and go to the next step.
In [Advanced Settings] for the custom paper in use, set [Skew Detection] to [Off].
Print the image. Is the problem resolved?
Yes
Finished!
No
Contact your service representative.
An envelope is used.
If an envelope flap at the trailing edge is oblique, a skew may be wrongly detected when the envelope is transferred with its flap open.
Disable the skew detection function.
<If custom paper is used>
In [Advanced Settings] for the custom paper in use, set [Skew Detection] to [Off].
<If custom paper is not used>
In the [Machine: Paper Feed/ Output] group on the [Adjustment Settings for Skilled Operators] menu, set [Skew Detection] to [Off].
The skew detection level is too high.
The skew detection level may be too high.
Decrease the skew detection level.
In the [Machine: Paper Feed/ Output] group on the [Adjustment Settings for Skilled Operators] menu, increase the value in [Skew Detection Level].
Increase the value to reduce the detection level.
Print the image. Is the problem resolved?
Yes
Finished!
No
Keep increasing the value until the problem is resolved.
If the problem persists even though the setting has reached its maximum value, go to the next step.
In the [Machine: Paper Feed/ Output] group on the [Adjustment Settings for Skilled Operators] menu, set [Skew Detection] to [Off].
![]()
If the skew detection level is reduced or the skew detection function is disabled, no misfeed report will be displayed. However, this may result in paper skew feeding. If you do not want this result, contact your service representative.
If the machine wrongly detects skew, see Wrong Detection of Skew.