![]()
|
![]()
When attaching multiple options, attach the paper feed unit first.
When using the lower paper trays with the lower paper tray, attach the lower paper tray to the lower paper trays before attaching to the printer.
Option configurations
The table below shows the possible configurations of printer and options.
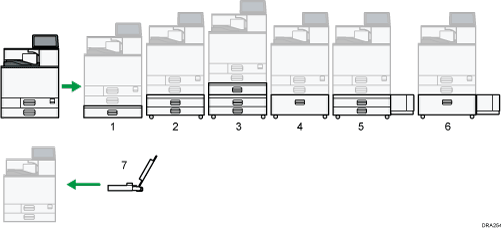
Printer + lower paper tray
Printer + lower paper trays
Printer + lower paper tray + lower paper trays
Printer + Tray 3 (LCT)
Printer + lower paper trays + Large Capacity Tray (LCT)
Printer + Tray 3 (LCT) + Large Capacity Tray (LCT)
To attach the Large Capacity Tray (LCT), contact your sales or service representative.
Banner paper guide tray
To attach the banner paper guide tray, contact your sales or service representative.
The procedure is the same for all three units. The lower paper trays is used as an example.
![]() Check the contents of the package.
Check the contents of the package.
Package contents for the lower paper tray
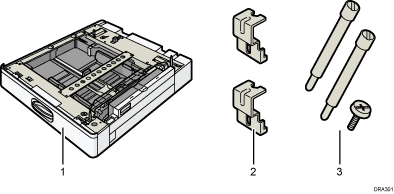
Lower Paper Tray
Brackets (2)
Screws (3)
Package contents for the lower paper trays
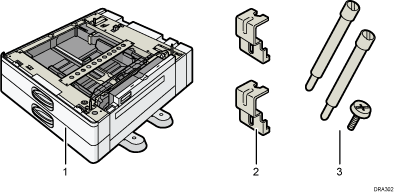
Lower Paper Trays
Brackets (2)
Screws (3)
Package contents for the Tray 3 (LCT)
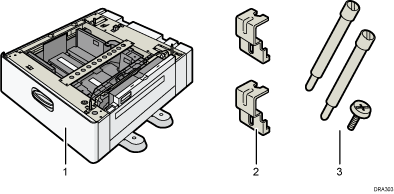
Tray 3 (LCT)
Brackets (2)
Screws (3)
![]() Turn the printer off and unplug the power cord.
Turn the printer off and unplug the power cord.
![]() Remove the packaging from the paper feed unit.
Remove the packaging from the paper feed unit.
![]() When using the lower paper trays with the lower paper tray, attach the units to each other first, and then attach them to the printer.
When using the lower paper trays with the lower paper tray, attach the units to each other first, and then attach them to the printer.
For instructions, see Attaching the lower paper tray to the lower paper trays.
![]() Lift the printer using the handles on both sides of the printer.
Lift the printer using the handles on both sides of the printer.
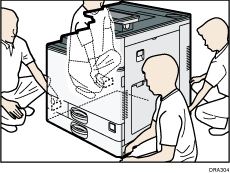
The printer should always be lifted by at least four people.
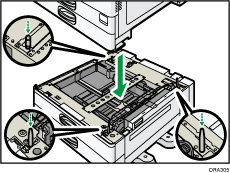
![]() Align the front of the printer with the front of the paper feed unit, and slowly lower it.
Align the front of the printer with the front of the paper feed unit, and slowly lower it.
Place it so that it is held firmly in place by the vertical pins.
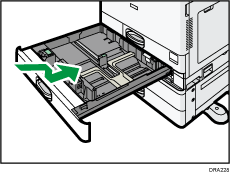
![]() Pull tray 2 of the printer out slowly until it stops, then lift the front of the tray slightly, and pull it out completely.
Pull tray 2 of the printer out slowly until it stops, then lift the front of the tray slightly, and pull it out completely.
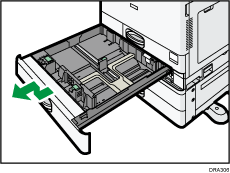
Place the tray on a flat surface.
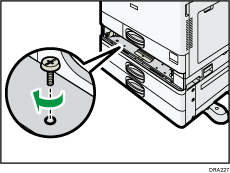
![]() Attach the screw in the hole on the left side of the tray opening to secure it to the paper feed unit.
Attach the screw in the hole on the left side of the tray opening to secure it to the paper feed unit.
Tighten the screw firmly using a coin.
![]() Lift the front of the tray, and slide it carefully into the printer until it stops.
Lift the front of the tray, and slide it carefully into the printer until it stops.
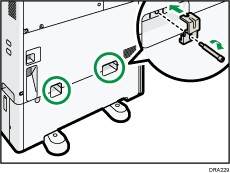
![]() On the rear of the unit, attach two brackets using the remaining screws.
On the rear of the unit, attach two brackets using the remaining screws.
Tighten the screws firmly using a coin.
![]() Plug in the power cord, and then turn on the printer.
Plug in the power cord, and then turn on the printer.
![]() Print the configuration page to confirm that the unit was attached correctly.
Print the configuration page to confirm that the unit was attached correctly.
![]()
To confirm whether the optional paper feed unit was correctly attached, print the configuration page, and check "Attached Equipment" on the configuration page. If the unit was attached correctly, the following will be displayed:
Lower Paper Tray: Lower Paper Tray
Lower Paper Trays: Lower Paper Trays
Tray 3 (LCT): Tray 3 (LCT)
For information about printing the configuration page, see Printing a Test Page.
If the optional paper feed unit was not installed properly, repeat the procedure from the beginning. If it cannot be installed correctly even after reattempting installation, contact your sales or service representative.
If the printed area is not positioned properly when printing from the paper feed unit, adjust the printing position. For details about adjustment, see When the Printing Position Changes.
To use the paper feed unit, configure the printer options in "Accessories" in the printer driver. For details about opening "Accessories", see "Configuring Option Settings for the Printer", Driver Installation Guide.