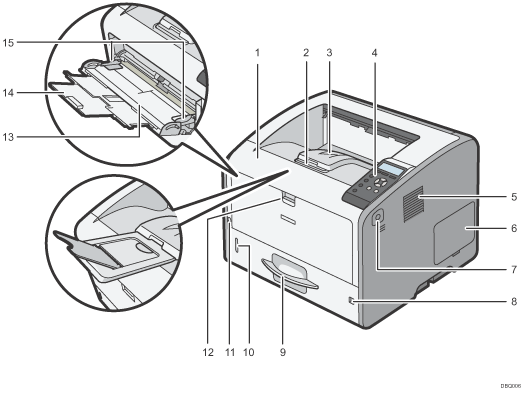
Front cover
Open to access the inside of the printer and remove jammed paper.
Open here to replace the print cartridge and the drum unit.
Tray Extension
Pull this fence to prevent paper from falling off.
Standard tray
Output is stacked here with the print side down.
Control panel
For details, see Guide to the Names and Functions of the Control Panel.
Ventilation holes
Prevent overheating.
Memory cover
Remove this cover to install the optional SDRAM module and hard disk.
Front cover open button
Push this button to open the front cover.
Paper size dial
Use this dial to specify the paper size. To use a paper size that is not indicated on the paper size dial, set the dial to "
 ". If this is the case, set the paper size using the control panel.
Tray 1
Up to 500 sheets of plain paper can be loaded.
For details about the sizes and types of paper that can be used, see Paper Size Specifications and Paper Type Specifications.
Remaining paper indicator
Indicates the approximate amount of paper remaining in the tray.
Main power switch
Use this switch to turn the power on and off.
For details about how to shut down the printer, see Turning Off the Power.
Bypass tray open lever
Push this lever to open the bypass tray.
Bypass tray
Up to 100 sheets of plain paper can be loaded.
For details about the sizes and types of paper that can be used, see Paper Size Specifications and Paper Type Specifications.
Extender for the bypass tray
Pull this extender out when loading A4
 , 81/2 × 11
 or larger size paper in the bypass tray.
Paper guides
When loading paper in the bypass tray, align the paper guides flush against the paper.
