Setting the Easy Setup
Select [Easy Setup] if you want to configure wireless LAN settings using Wi-Fi Protected Setup (WPS).
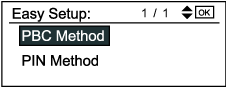
Select either [PBC Method] or [PIN Method] that is correct to network connection via the access points you can use. Specify the settings according to your operating environment.
For details about the configuration and functions of the wireless LAN access point or router in use, see the manual supplied with the device.
PBC Method
![]() Start the wireless LAN access point.
Start the wireless LAN access point.
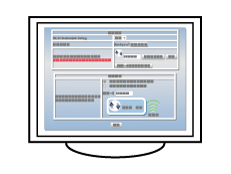
![]() Switch on the machine.
Switch on the machine.
![]() Press the [User Tools] key.
Press the [User Tools] key.
![]() Press [Login].
Press [Login].
![]() Enter the login password, and then press the [OK] key.
Enter the login password, and then press the [OK] key.
If this is the first time to do this, enter "000000" as the password.
![]() Press the [
Press the [![]() ] or [
] or [![]() ] key to display [System Settings], and then press the [OK] key.
] key to display [System Settings], and then press the [OK] key.
![]() Press the [
Press the [![]() ] or [
] or [![]() ] key to display [Interface Settings], and then press the [OK] key.
] key to display [Interface Settings], and then press the [OK] key.
![]() Press the [
Press the [![]() ] or [
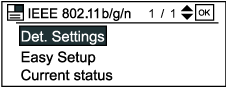
] or [![]() ] key to display [IEEE 802.11], and then press the [OK] key.
] key to display [IEEE 802.11], and then press the [OK] key.
![]() Press the [
Press the [![]() ] or [
] or [![]() ] key to display [Easy Setup], and then press the [OK] key.
] key to display [Easy Setup], and then press the [OK] key.
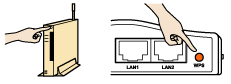
![]() Press the WPS button on the access point.
Press the WPS button on the access point.
![]() Press the [
Press the [![]() ] or [
] or [![]() ] key to display [PBC Method], and then press the [OK] key.
] key to display [PBC Method], and then press the [OK] key.
If the connection is successful, “Connection to AP has succeeded.” will be displayed.
If the connection fails, “Connection to AP has failed.” is displayed. If this is the case, go back to step 9. If the problem persists, check whether the access point is working properly. If the access point is working properly but the problem still persists, contact your sales or service representative.
![]()
If the access point cannot be detected within 120 seconds, the search session expires.
PIN Method
![]() Start the wireless LAN access point.
Start the wireless LAN access point.
![]() Switch on the machine.
Switch on the machine.
![]() Press the [User Tools] key.
Press the [User Tools] key.
![]() Press [Login].
Press [Login].
![]() Enter the login password, and then press the [OK] key.
Enter the login password, and then press the [OK] key.
If this is the first time to do this, enter "000000" as the password.
![]() Press the [
Press the [![]() ] or [
] or [![]() ] key to display [System Settings], and then press the [OK] key.
] key to display [System Settings], and then press the [OK] key.
![]() Press the [
Press the [![]() ] or [
] or [![]() ] key to display [Interface Settings], and then press the [OK] key.
] key to display [Interface Settings], and then press the [OK] key.
![]() Press the [
Press the [![]() ] or [
] or [![]() ] key to display [IEEE 802.11], and then press the [OK] key.
] key to display [IEEE 802.11], and then press the [OK] key.
![]() Press the [
Press the [![]() ] or [
] or [![]() ] key to display [Easy Setup], and then press the [OK] key.
] key to display [Easy Setup], and then press the [OK] key.
![]() Press the [
Press the [![]() ] or [
] or [![]() ] key to display [PIN Method], and then press the [OK] key.
] key to display [PIN Method], and then press the [OK] key.
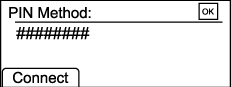
![]() Enter the machine's PIN on the access point web page.
Enter the machine's PIN on the access point web page.
For details, see the manual supplied with the wireless LAN access point.
![]() Execute WPS (PIN system) from the access point's web page.
Execute WPS (PIN system) from the access point's web page.
![]() Press [Connect].
Press [Connect].
If the connection fails, “Connection to AP has failed.” is displayed. If this is the case, go back to step 11. If the problem persists, check whether the access point is working properly. If the access point is working properly but the problem still persists, contact your sales or service representative.