Use the bypass tray to copy onto OHP transparencies, adhesive labels, translucent paper, and paper that cannot be loaded in the paper trays.
About how to load paper in the bypass tray, see Paper Specifications and Adding Paper for details![]() .
.
![]()
The Duplex function cannot be performed on paper fed from the bypass tray. If [1 Sided
 2 Sided:TtoT] is selected, cancel the setting. You can also change the initial settings. For details, see "Changing the Default Functions of the Initial Screen", Convenient Functions.
If the paper type you want to copy onto is not shown on the [Bypss. Ppr. Typ] screen or its paper weight is between 82–105 g/m2 (20–28 lb. Bond), you must specify the paper type under [Tray Paper Settings] in User Tools. For details about [Tray Paper Settings], see "System Settings", Connecting the Machine/ System Settings.
If you want to copy onto paper that is between 60–74 g/m2 (16–20 lb. Bond), change the paper thickness under [Plain Paper Setting] in User Tools. For details, see "Changing Paper Thickness Settings", Paper Specifications and Adding Paper.
Usage of the bypass tray
Press [Usage] on the [Bypass Paper] screen to display an explanation about the originals and paper orientation.
![]() Load the paper face down in the bypass tray.
Load the paper face down in the bypass tray.
[Bypass] is automatically selected.
![]() Press the [
Press the [![]() ] key.
] key.
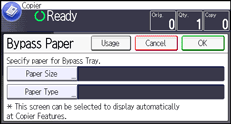
![]() Press [Paper Size].
Press [Paper Size].
![]() Specify the size of the paper, and then press [OK].
Specify the size of the paper, and then press [OK].
![]() Press [Paper Type].
Press [Paper Type].
![]() Specify the type of the paper as necessary, and then press [OK] twice.
Specify the type of the paper as necessary, and then press [OK] twice.
![]() Place the originals, and then press the [Start] key.
Place the originals, and then press the [Start] key.
![]() When the copy job is finished, press the [Reset] key to clear the settings.
When the copy job is finished, press the [Reset] key to clear the settings.
![]()
If you specify [Display Automatically] for [Paper Settings Screen for Bypass], you can display the [Bypass Paper] screen by pressing [Bypass] instead of pressing the [
 ] key. For details, see General Features
 .
.If the bypass tray is not automatically selected, press [Bypass].