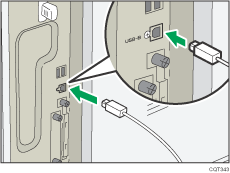
This section explains how to connect a USB 2.0 (Type B) interface cable to the USB 2.0 port.
![]()
|
![]()
If the main power switch is on, turn it off.
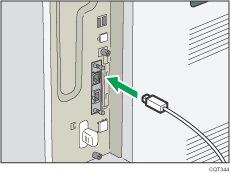
The printer's USB port is not available when the Gigabit Ethernet board is attached to the printer.
![]() Connect a USB 2.0 (Type B) interface cable to the USB port B.
Connect a USB 2.0 (Type B) interface cable to the USB port B.

For connecting to the USB port of the Gigabit Ethernet board:

![]() Connect the other end to the USB 2.0 port on the host computer.
Connect the other end to the USB 2.0 port on the host computer.
![]()
This printer does not come with a USB 2.0 (Type B) interface cable. Make sure you purchase the appropriate cable for the printer (connector shape) and your computer.
Use a five meter (16.4 foot) or shorter cable which supports USB 2.0 (Type B) interface.
Check the type of the plug before connecting.
Do not pull the connected cable forcefully. Make sure the cable is properly connected. Otherwise, it might become disconnected or somebody might trip on it.
Using a cable with some connectors or converters may result in an improper connection.
For details about installing the printer driver, see "Installing the Printer Driver for a Local Connection", Driver Installation Guide.
