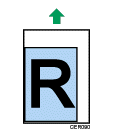
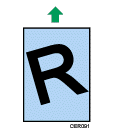
Status |
Possible Causes, Descriptions, and Solutions |
Toner smears appear on the print side of the page. |
The paper setting may not be correct. For example, although you are using thick paper, the setting for thick paper may not be set. Check the printer driver's paper settings. See the printer driver Help. Confirm that the paper is not curled or bent. Envelopes can be curled easily. Flatten paper before loading. See Paper and Other Media . .
|
Paper jams occur frequently. |
Number of paper set in the tray exceeds the limit. Confirm that the top of the stack is not higher than the limit mark inside the tray. See Loading Paper . . There may be a gap between the front end paper guide and the paper, or between the paper guide both side and the paper in the paper tray. Make sure there are no gaps. See Loading Paper . . Paper is either too thick or too thin. See Paper and Other Media . . Paper is bent or wrinkled. Use paper that have no bents or wrinkles. See Paper and Other Media . . Paper has already been printed on. See Paper and Other Media . . Paper is damp. Use paper that has been stored properly. See Paper and Other Media . . The friction pad or paper feed roller may be dirty. Clean the pertinent section as necessary. See Cleaning the Friction Pad and the Paper Feed Roller . . The paper setting may not be correct. For example, although you are using thick paper, the setting for thick paper may not be set. Check the printer driver's paper settings. See the printer driver Help.
|
Prints fall behind the machine when they are output. |
Raise the appropriate stop fence (forward fence for A4, rear fence for legal size prints). See, Exterior: Front View . .
|
Prints do not stack properly. |
Paper is damp. Use paper that has been stored properly. See Paper and Other Media . . Pull out the extender. Perform the following operation.
Press the [Menu] key on the control panel, select [Maintenance], and then press the [OK] key. Press the [ ] or [ ] or [ ] key and select [Low Humid. Mode], and then press the [OK] key. ] key and select [Low Humid. Mode], and then press the [OK] key. Press the [ ] or [ ] or [ ] key, and then select [On]. ] key, and then select [On]. Note that the first print takes longer than subsequent prints to complete. See the printer driver help.
Raise the appropriate stop fence (forward fence for A4, rear fence for legal size prints). See, Exterior: Front View . .
|
Multiple pages are fed at once. |
There may be a gap between the front end paper guide and paper, or between the paper guide both side and paper in the paper tray. Make sure there are no gaps. See Loading Paper . . Paper is either too thick or too thin. See Paper and Other Media . . Paper has already been printed on. See Paper and Other Media . . Number of paper set in the tray exceeds the limit. Confirm that the top of the stack is not higher than the limit mark inside the tray. See Paper and Other Media . . Paper is static. Use paper that has been stored properly. See Paper and Other Media . . The friction pad or paper feed roller may be dirty. Clean the pertinent section as necessary. See Cleaning the Friction Pad and the Paper Feed Roller . . Check that paper has not been added while there is still some left in the tray. Only add paper when there is none left in the tray. Fan the paper before loading.
|
Paper gets wrinkles. |
Paper is damp. Use paper that has been stored properly. See Paper and Other Media . . Paper is too thin. See Paper and Other Media . . There may be a gap between the front end paper guide and the paper, or between the paper guide both side and the paper in the paper tray. Make sure there are no gaps. See Loading Paper . .
|
Images are not printed in the right position 
|
Adjust the front end paper guide and both side paper guides to match the paper size. See Loading Paper . . |
Images are printed diagonally to the pages 
|
Adjust the front end paper guide and both side paper guides to match the paper size. See Loading Paper . . |
Horizontal lines appear on the printed paper. |
Impact can cause lines to appear on printed paper and other malfunctions. Protect the printer from impact at all times, especially while it is printing. If lines appear on prints, turn the printer off, wait a few moments, and then turn it back on again. Then, perform the print job again.
|
Paper is not fed from the selected tray. |
Make sure that the settings made on the printer driver match the settings made on the control panel. |
A printed image is different from the image on the computer's display. |
When you use some functions, such as enlargement and reduction, the layout of the image might be different from that displayed in the computer display. |
It takes too much time to resume printing. |
The data is so large or complex that it takes time to process it. If the Data In indicator is blinking, the data is being processed. Just wait until it resumes. The printer was in the Energy Saver mode. To resume from the Energy Saver mode, the printer has to warm up, and this takes time until printing starts. To disable Energy Saver mode:
Press the [Menu] key on the control panel, select [System], and then press the [OK] key. Press the [ ] or [ ] or [ ] key and select [Energy Saver 2], and then press the [OK] key. ] key and select [Energy Saver 2], and then press the [OK] key. Press the [ ] or [ ] or [ ] key, and then select [Off]. ] key, and then select [Off].
|
It takes too much time to complete the print job. |
Photographs and other data intensive pages take a long time for the printer to process, so simply wait when printing such data. Changing the settings with printer driver may help to speed up printing. See the printer driver Help. The data is so large or complex that takes time to process. If the Data In indicator is blinking, the data is being processed. Just wait until it resumes. If the Data In indicator on the control panel is flashing, the printer is warming up. Wait for a while.
|
Images are cut off, or excess pages are printed. |
If you are using paper smaller than the paper size selected in the application, use the same size paper as that selected in the application. If you cannot load paper of the correct size, use the reduction function to reduce the image, and then print. See the printer driver Help. |
Photo images are coarse. |
Some applications lower the resolution for making prints. |
The whole printout is blurred. |
Paper is damp. Use paper that has been stored properly. See Paper and Other Media . . Perform the following operation.
Press the [Menu] key on the control panel, select [Maintenance], and then press the [OK] key. Press the [ ] or [ ] or [ ] key and select [Low Humid. Mode], and then press the [OK] key. ] key and select [Low Humid. Mode], and then press the [OK] key. Press the [ ] or [ ] or [ ] key, and then select [On]. ] key, and then select [On].
If the Alert indicator on the control panel lights up and the following message appears on the display, replace the print cartridge: [Replace Print Cartridge] See Replacing the Print Cartridge . . Condensation may have collected. If rapid change in temperature or humidity occurs, use this printer only after it has acclimatized.
|
White streaks appear. |
Toner is almost depleted. If an error message appears on the control panel, replace the print cartridge. See Replacing the Print Cartridge . . |
The backs of printed sheets are blemished. |
When removing a jammed sheet, the inside of the printer may have become dirtied. Print several sheets until they come out clean. If document size is larger than paper size, e.g. A4 document on B5 paper, the back of the next printed sheet may be dirtied.
|
If rubbed with your finger, it smears out. |
The setting of the paper may not be correct. For example, although thick paper is used, the setting for thick paper may not be set.
Check the paper settings of this printer. See Types of Paper and Other Media . . Check the paper settings of the printer driver. See the printer driver Help.
|
The toner has run out and printing has stopped. |
When the toner runs out, pressing the [Stop/Start] key allows you to print a few more pages, but the print quality of those pages cannot be guaranteed. |
The toner is powdery and comes away from the paper, or the printed image has a matt appearance. |
Check if the levers are lowered. Raise the levers. |
Printed envelopes come out creased. |
Check if thelevers are properly set. |
If the problem cannot be solved, contact your sales or service representative.


