Installing the Hard Disk
![]()
Before touching the hard disk, touch something metal to discharge any static electricity. Static electricity can damage the hard disk.
Do not subject the hard disk to physical shocks.
![]() Check the package contains the following:
Check the package contains the following:
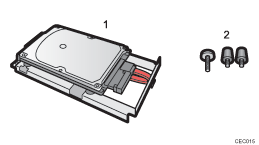
Hard disk
Screws
![]() Turn off the power to the printer, and then unplug the power cable and interface cable.
Turn off the power to the printer, and then unplug the power cable and interface cable.
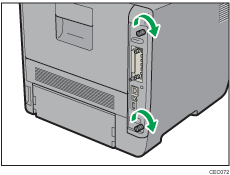
![]() Remove the two screws holding the controller board in place.
Remove the two screws holding the controller board in place.
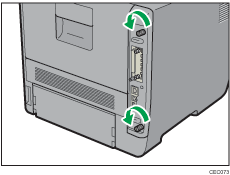
The removed screws are required to fasten the controller board.
![]() Gripping the handles, carefully pull out the controller board.
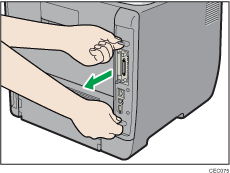
Gripping the handles, carefully pull out the controller board.
![]() Place the controller board on a flat surface.
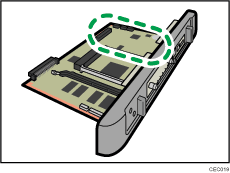
Place the controller board on a flat surface.
The hard disk is installed in the slot shown in the illustration below.
![]() Insert the protrusion on the front end of the hard disk board into the notch on the back panel of the controller board.
Insert the protrusion on the front end of the hard disk board into the notch on the back panel of the controller board.
Be sure to set the hard disk board parallel with the controller board.
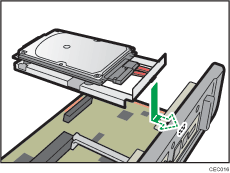
![]() Fit the hard disk on the connector of the controller board carefully until it stops.
Fit the hard disk on the connector of the controller board carefully until it stops.
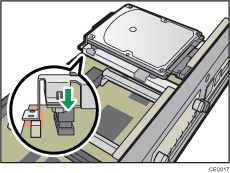
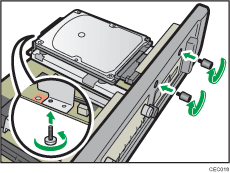
![]() Tighten the two screws by turning them clockwise with a coin, and then secure the hard disk board by tightening the third screw from the under side of the controller board.
Tighten the two screws by turning them clockwise with a coin, and then secure the hard disk board by tightening the third screw from the under side of the controller board.
![]() To install other options on the controller board, follow the installation procedure shown in the documentation provided with the option.
To install other options on the controller board, follow the installation procedure shown in the documentation provided with the option.
![]() Align the controller board with the top and bottom rails, and then push it carefully in, until it stops.
Align the controller board with the top and bottom rails, and then push it carefully in, until it stops.
The printer may malfunction if the controller board is not properly installed.
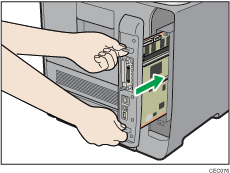
![]() Fasten the controller board to the printer with the two screws.
Fasten the controller board to the printer with the two screws.
First install the optional hard disk, and then install the SD card provided with the hard disk. For details about the installation procedure, see Installing the SD Memory Card Options.
![]()
After finishing installation, you can check whether the hard disk is properly installed: Print the configuration page from the [List/Test Print] menu. If it is installed properly, you will see "Hard Disk" will appear for "Device Connection" on the configuration page.
If the Hard disk is not properly installed, repeat this procedure. If you cannot install it properly even after reinstallation, contact your sales or service representative.
For details on printing the configuration page, see Test Printing.

