Loading Paper in Tray 2
The following example explains the loading procedure for Tray 2.
![]()
Before printing on paper other than envelopes, make sure that the fusing unit levers inside the front cover are pulled up. Leaving the levers lowered can cause print quality problems when printing on paper other than envelopes.
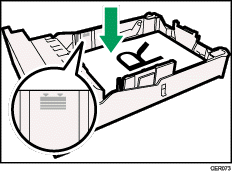
Make sure paper is not stacked above the limit mark inside the tray. Misfeeds might occur.
After loading paper in the tray, specify the paper type and size using the control panel to avoid printing problems. This machine does not detect the paper size automatically.
Do not mix different types of paper in the same paper tray.
Do not move the side paper guides forcefully. Doing so can damage the tray.
Do not move the end paper guide forcefully. Doing so can damage the tray.
When inserting the tray, make sure it is not slanted. Inserting it at a slant can damage the machine.
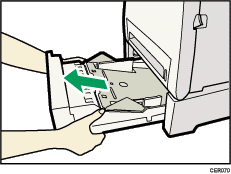
![]() Lift and pull Tray 2 carefully, and then pull it out with both hands.
Lift and pull Tray 2 carefully, and then pull it out with both hands.
Place the tray on a flat surface.
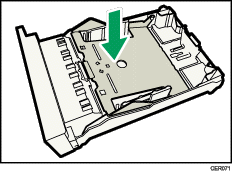
![]() Press down on the bottom plate until it clicks.
Press down on the bottom plate until it clicks.
![]() Pinch the clips on the side paper guide, and then adjust the guide to the paper size.
Pinch the clips on the side paper guide, and then adjust the guide to the paper size.
![]() Pinch the clip on the end paper guide and align the arrow with the paper size.
Pinch the clip on the end paper guide and align the arrow with the paper size.
![]() Load the new paper stack print side up.
Load the new paper stack print side up.
Make sure paper is not stacked higher than the upper limit (upper line) marked inside the tray.
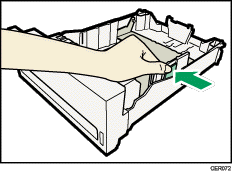
![]() Lift and slide the tray, then push it all the way in.
Lift and slide the tray, then push it all the way in.
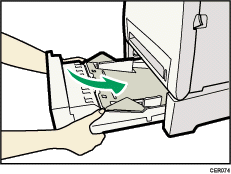
To avoid paper jams, make sure the tray is securely inserted.
![]()
The upper limit differs depending on paper type; thin paper or thick paper. Check the engraved line inside the tray to confirm the upper limit.
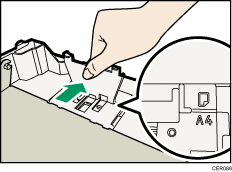
The remaining paper indicator on the right front side of the paper tray shows approximately how much paper is remaining.
![]()
For details about paper types supported by the machine, see Paper and Other Media
 .
.For details about the paper settings, see Specifying Paper Type and Paper Size
.