Installing the Paper Feed Unit (Optional)
This section describes how to install the paper feed unit.
![]()
|
![]()
|
|
|
|
|
|
![]()
Do not grip on the tray area when lifting the machine.
When three paper feed units are installed, they are detected as “Tray 2”, “Tray 3”, and “Tray 4”, starting from the upper unit.
The same procedure applies when installing the paper feed unit with the casters (optional).
The number of optional trays that can be installed differs depending on the location where the machine is installed.
If the machine is installed on a desk or other elevated surface, up to one paper feed unit can be stacked.
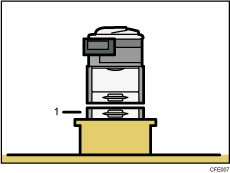
Paper feed unit
If the machine is installed directly on the floor, up to three paper feed units can be stacked. Stack the paper feed unit with casters to the bottom of the machine.
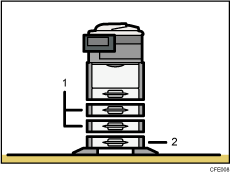
Paper feed unit
Paper feed unit with the casters
![]() Check the package contains the following:
Check the package contains the following:
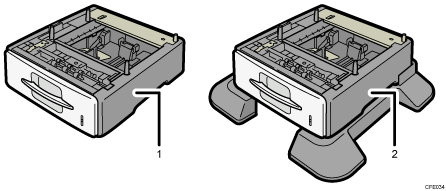
Paper feed unit
Paper feed unit with the casters
![]() Remove the adhesive tape from the paper feed unit.
Remove the adhesive tape from the paper feed unit.
![]() Turn off the main power switch, and then unplug the machine's power cord from the wall outlet.
Turn off the main power switch, and then unplug the machine's power cord from the wall outlet.
![]() Lift the machine by the inset grips on its sides.
Lift the machine by the inset grips on its sides.
At least four people are needed to lift the machine.
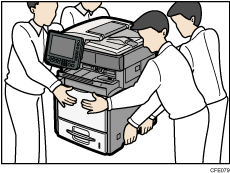
When moving the machine, do not hold on the following parts as doing so could cause a malfunction:
The handle onto the standard paper feed tray.
The underside of the bypass tray.
![]() There are four upright pins on the paper feed unit. Align them with the holes on the underside of the machine, and then carefully lower the machine.
There are four upright pins on the paper feed unit. Align them with the holes on the underside of the machine, and then carefully lower the machine.
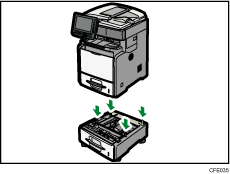
When installing two or more units, first connect the units together, and then attach them as a single unit to the machine.
![]() After installing the paper feed unit, check the paper tray on the display.
After installing the paper feed unit, check the paper tray on the display.
![]()
If the paper feed unit is not installed properly, reinstall it following this procedure. If you cannot install it properly even after attempting reinstallation, contact your sales or service representative.
If the print area is not centered correctly, adjust the printing position for the paper feed unit. For details, see “Adjusting Printing Position”, Troubleshooting.
For details about loading paper onto the paper tray, see “Loading Paper into Trays 1
 4” or “Changing the Paper Size in Trays 1
  4”.
4”.After a new paper feed unit has been installed, the driver settings might need to be reconfigured. For details, see the printer driver Help.

