Registering an NCP Folder
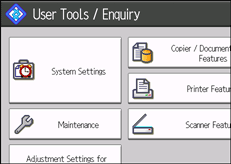
![]() Press the [User Tools] key.
Press the [User Tools] key.
![]() Press [System Settings].
Press [System Settings].
![]() Press [Administrator Tools].
Press [Administrator Tools].
![]() Press [Address Book Management].
Press [Address Book Management].
![]() Check that [Program / Change] is selected.
Check that [Program / Change] is selected.
![]() Press the name you want to register or enter the registered number using the number keys.
Press the name you want to register or enter the registered number using the number keys.
You can search by the registered name, user code, e-mail address, or folder name.
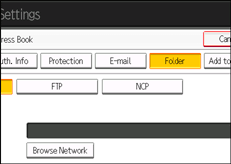
![]() Press [Folder].
Press [Folder].
![]() Press [NCP].
Press [NCP].
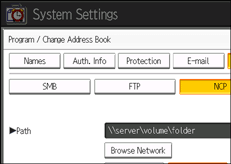
![]() Select "Connection Type".
Select "Connection Type".
If you want to specify a folder in an NDS tree, press [NDS]. If you want to specify a folder on a NetWare server, press [Bindery].
![]() Specify the path.
Specify the path.
To specify a folder, you can either enter the path manually or locate the folder by browsing the network.
For details about how to specify the path manually, see Locating the NCP folder manually![]() .
.
For details about how to specify the path using Browse Network, see Locating the NCP folder using Browse Network![]() .
.
![]() Press [Connection Test] to check the path is set correctly.
Press [Connection Test] to check the path is set correctly.
![]() Press [Exit].
Press [Exit].
If the connection test fails, check the settings, and then try again.
![]() Press [Auth. Info], and then press [
Press [Auth. Info], and then press [![]() Next].
Next].
![]() Press [Specify Other Auth. Info] on the right side of "Folder Authentication".
Press [Specify Other Auth. Info] on the right side of "Folder Authentication".
When [Do not Specify] is selected, the NCP User Name and NCP Password that you have specified in "Default User Name / Password (Send)" of File Transfer settings applies. For details, see File Transfer![]() .
.
![]() Press [Change] under "Login User Name".
Press [Change] under "Login User Name".
![]() Enter the login user name, and then press [OK].
Enter the login user name, and then press [OK].
![]() Press [Change] under "Login Password".
Press [Change] under "Login Password".
![]() Enter the password, and then press [OK].
Enter the password, and then press [OK].
![]() Enter the password again to confirm, and then press [OK].
Enter the password again to confirm, and then press [OK].
![]() Press [OK].
Press [OK].
![]() Press [Exit].
Press [Exit].
![]() Press the [User Tools] key.
Press the [User Tools] key.
![]()
To register the name, see Registering Names
 .
.You can enter up to 64 characters for the user name.
You can enter up to 64 characters for the password.
If user authentication is specified, contact your administrator.
If you wish to register a shared folder under Windows or Mac OS X, see Registering an SMB Folder
.If you wish to register an FTP folder, see Registering an FTP Folder
.