Z-fold
Makes two parallel folds, one of which faces in and the other facing out.
![]()
You cannot use Punch with this function.
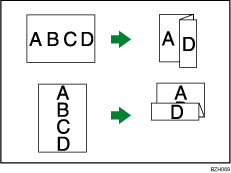
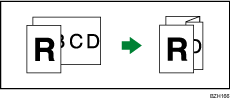
Original orientation and Z-fold position
Place all the originals in the ADF in the orientation in which they can be read normally. When placing the original on the exposure glass, keep the same orientation, but set the original facing downwards.
The relationship between the orientation in which you place the original and the Z-fold positions is as follows:
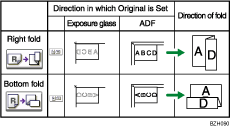
*1 The above table shows Z-fold positions. The orientation of the paper does not indicate orientation of delivery.
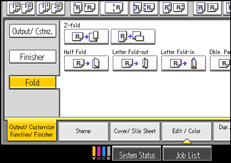
![]() Press [Output/ Customize Function/ Finisher].
Press [Output/ Customize Function/ Finisher].
![]() Press [Fold].
Press [Fold].
![]() Select the folding direction, and then press [OK].
Select the folding direction, and then press [OK].
![]() Place the originals, and then press the [Start] key.
Place the originals, and then press the [Start] key.
![]()
You can specify the fold-back position in 1 mm (0.04 inches) increments under Z-fold Position in User Tools. For details about Z-fold Position, see “System Settings”, Network and System Settings Reference
 .
.For details about the number of Z-folded copies that can be stacked on the finisher trays, see “Specifications for Finisher SR5030 (Optional)” or “Specifications for Booklet Finisher SR5040 (Optional)”, About This Machine
 .
.Depending on the Z-fold settings, you may not be able to use Rotate Copy.
Even if you place different size originals in the ADF, appropriate size of copy paper can be automatically selected and Z-folded using the Mixed Sizes mode and Auto Paper Select function. Load the paper you want to use in the paper trays beforehand.
Paper sizes that can be Z-folded when using the Mixed Sizes mode are as follows (the larger size paper is Z-folded):
A3
 and A4
B4 JIS
and B5 JISA4
and A511 × 17
and 81/2 × 1181/2 × 11
and 51/2 × 81/2
When Mixed Sizes mode is enabled, paper of the following sizes can be stapled after being Z-folded:
A3
and A4B4 JIS
and B5 JIS11 × 17
and 81/2 × 11
The paper sizes that can be stapled after being Z-folded are A3
, B4 JIS, and 11 × 17.The number of Z-folded copies that can be stapled is as follows (paper weight: 80.0 g/m2, 20.0 lb. Bond)
10 Z-folded sheets, 9 Z-folded sheets and 0 to 10 unfolded sheets, 8 Z-folded sheets and 0 to 20 unfolded sheets, 7 Z-folded sheets and 0 to 30 unfolded sheets, 6 Z-folded sheets and 0 to 40 unfolded sheets, 5 Z-folded sheets and 0 to 50 unfolded sheets, 4 Z-folded sheets and 0 to 60 unfolded sheets, 3 Z-folded sheets and 0 to 70 unfolded sheets, 2 Z-folded sheets and 0 to 80 unfolded sheets, 1 Z-folded sheet and 1 to 90 unfolded sheets
When using this function with 1 Sided
 2 Sided and Mixed Sizes modes, always ensure that the originals of each size are in even numbers. If you have an odd number of originals, insert blank sheets to adjust the total.
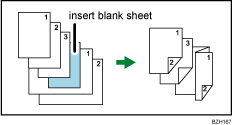
Even if you have selected Face Up for Copy Eject Face Method in Glass Mode in User Tools, the copies will be delivered face down. For details, see Input / Output
 .
.To use the Z-fold function, you must set the Z-fold support tray. For details about how to set the Z-fold support tray, see “When the Output Z-folded Paper Is Less than the Stack Capacity”, Troubleshooting
.Folded copies that are delivered to the multi-folding unit tray might be stacked with their folds open. If this happens, the position of the folds is unaffected and the copies will still be output in order. Stacked copies can be easily separated in the order they are delivered. To prevent their folded sections overlapping, configure the machine to deliver folded copies to the finisher upper tray or finisher shift tray.
Remove the Z-fold support tray when delivering copies to the finisher shift tray or the multi-folding unit tray without using the Z-fold function. If you leave the Z-fold support tray in place, prints are not stacked properly.