Changing the Paper Size in the Wide Large Capacity Tray
This section explains how to change the paper size in the Wide LCT.
![]()
If a paper tray is pushed vigorously when putting it back into place, the position of the tray's side fences may slip out of place.
Check that the paper edges are aligned with the left side.
Do not stack paper over the limit mark.
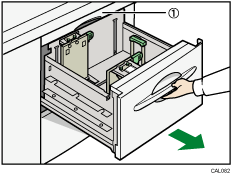
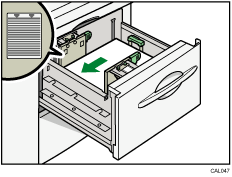
![]() Carefully pull out the paper tray until it stops.
Carefully pull out the paper tray until it stops.
Paper transfer unit
Do not open the paper transfer unit when the paper tray is in use, or a misfeed might occur.
![]() Release the end fence.
Release the end fence.
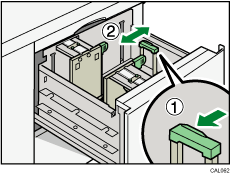
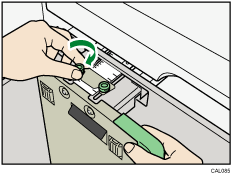
![]() Loosen the screws holding the side fences in position.
Loosen the screws holding the side fences in position.
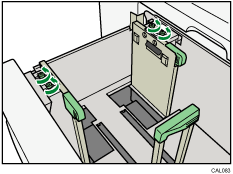
![]() Load paper by aligning the paper with the left side of the paper tray.
Load paper by aligning the paper with the left side of the paper tray.
Place paper with print side up.
Load a stack of paper about 5 - 10 mm (0.25 - 0.4 inches) high.
To load paper smaller than B5 JIS![]() that has a vertical length of 139.7 to less than 257 mm (5.5 to less than 10.12 inches), remove the paper supports. For details about how to remove the paper supports, see "Loading small size paper into the Wide Large Capacity Tray".
that has a vertical length of 139.7 to less than 257 mm (5.5 to less than 10.12 inches), remove the paper supports. For details about how to remove the paper supports, see "Loading small size paper into the Wide Large Capacity Tray".
Make sure the paper rest on top of the supporting plates on both sides.
Supporting plates
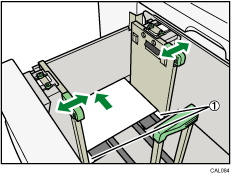
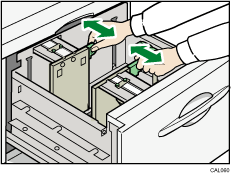
![]() Slide the side fences into position according to the size of the paper.
Slide the side fences into position according to the size of the paper.
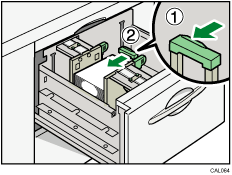
![]() Set the paper flush against the protrusions in the bottom of the inner side fence.
Set the paper flush against the protrusions in the bottom of the inner side fence.
![]() Slide the side fences into position according to the paper size. Secure the side fences by carefully tightening the screws.
Slide the side fences into position according to the paper size. Secure the side fences by carefully tightening the screws.
![]() Load additional sheets, if necessary.
Load additional sheets, if necessary.
![]() Tightly fit the end fence to the loaded paper, and then re-lock the end fence again.
Tightly fit the end fence to the loaded paper, and then re-lock the end fence again.
![]() Carefully slide the paper tray fully in.
Carefully slide the paper tray fully in.
![]() Check the size on the display.
Check the size on the display.