
| |||
This section describes the user tools in the Administrator Tools menu under System Settings.
Administrator Tools are used by the administrator. To change these settings, contact the administrator.
We recommend specifying Administrator Authentication before making Administrator Tools settings.
Default settings are shown in bold type.
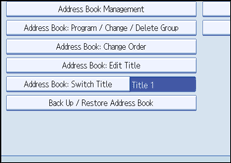
Address Book Management
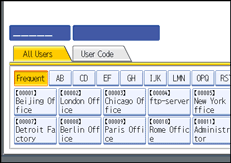
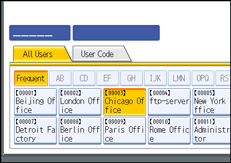
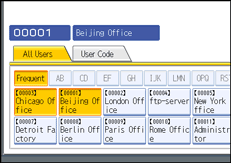
You can add, change or delete information registered in the Address Book.
For details, see "Address Book".
Program / Change
You can register and change names as well as user codes.
Names
You can register a name, key display, registration number, and title selection.
Auth. Info
You can register a user code, and specify the functions available to each user code.
Add to Group
You can put names registered in the Address Book into a group.
Delete
You can delete a name from the Address Book.
You can register up to 500 names.
You can register up to 500 user codes.
You can also register and manage names in the Address Book using Web Image Monitor.
Address Book: Program / Change / Delete Group
Names registered in the Address Book can be added into a group. You can then easily manage the names registered in each group.
Program / Change
You can register and change groups.
Names
You can register a name, key display, registration number, and title selection.
Programmed User/Group
You can check the names or groups registered in each group.
Add to Group
You can put groups registered in the Address Book into a group.
Delete
You can delete a group from the Address Book.
You can register up to 100 groups.
You can also register and manage groups in the Address Book using Web Image Monitor.
Address Book: Change Order
Changes the order of registered names.
You can rearrange the order of items on the same page, but you cannot move items to another page.
For example, you cannot move an item from "PLANNING" ([OPQ]) to "DAILY" ([CD]).
Press the [User Tools] key.
Press [System Settings].
Press [Administrator Tools].
Press [Address Book: Change Order].
Press the name key to be moved.
You can select a name using the number keys.
Press the name key in place you want to move it to.
The user key is moved to the selected position, and the user key currently at the selected position is moved forward or backward.
If you move the selected user key forward, the user key currently at the selected position is moved backward.
If you move the selected user key backward, the user key currently at the selected position is moved forward.
You can also select a name using the number keys.
Address Book: Edit Title
You can edit the title to easily find a user.
Press the [User Tools] key.
Press [System Settings].
Press [Administrator Tools].
Press [Address Book: Edit Title].
Press the title key you want to change.
Enter the new name, and then press [OK].
Press [OK].
Press the [User Tools] key.
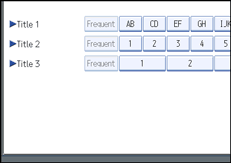
Address Book: Switch Title
Specifies the title to select a name.
The default setting is Title 1.
Back Up / Restore Address Book
You can back up the printer's address book to external storage or restore the backup copy from the external storage.
Restore data overwrites Address Book data stored on the printer and clears the counter of each registered user of the printer.
You can also back up and restore the printer's Address Book using Web Image Monitor. For details, see the Help files of Web Image Monitor.
Back Up
You can back up the printer's address book to external storage.
Restore
You can restore the backup copy of the address book from external storage.
Format
You can format the external storage.
Obtain Memory Device Info
The free space and occupied space of the external storage are displayed.
Display / Print Counter
Allows you to view and print the number of prints.
Display / Print Counter
Displays the number of prints for each function (Total, Printer, A3/DLT, Duplex, GPC, GPC Printer, Coverage).
Print Counter List
Prints a list of the number of prints made under each function.
Display / Clear / Print Counter per User
Allows you to view and print the numbers of prints accessed with user codes, and to set those values to 0.
Press [![]() Previous] and [
Previous] and [![]() Next] to show all the numbers of prints.
Next] to show all the numbers of prints.
The number of prints may differ from the counter values shown in Display/Print Counter.
Print Counter List for All Users
Prints the counter value for all the users.
Clear Counter List for All Users
Resets the counter value for all the users.
Print Counter List Per User
Prints the counter value for each user.
Clear Counter List Per User
Resets the counter value for each user.
Select All on the Page
Selects all the users on the page.
User Authentication Management
User Code Auth.
Using User Code Authentication, you can limit the available functions and supervise their use.
When using User Code Authentication, register the user code.
Using the Printer PC Control function, you can obtain a log of prints corresponding to the codes entered using the printer driver.
For details about Basic Authentication, Windows Authentication, LDAP Authentication, and Integration Server Authentication, consult your administrator.
Functions to Restrict
[Printer], [Printer: PC Control]
Basic Auth.
Windows Auth.
LDAP Auth.
Integration Svr. Auth.
Off
The default setting is Off.
Administrator Authentication Management
For details about this function, consult your administrator.
Program / Change Administrator
For details about this function, consult your administrator.
Extended Security
You can specify whether or not to use the extended security function. For details about the extended security functions, consult your administrator.
Program / Change / Delete LDAP Server
You can program the LDAP server to find up e-mail destinations in the LDAP server Address Book directly.
Name
Server Name
Search Base
Port Number
Use Secure Connection (SSL)
Authentication
User Name
Password
Realm Name
Search Conditions
This function supports LDAP Version 2.0 and 3.0.
For details about how to program the LDAP Server, see "Programming the LDAP server".
Program / Change / Delete Realm
You can program the realm to be used for Kerberos authentication.
Realm Name
KDC Server Name
Domain Name
Be sure to set both the realm name and KDC server name when programming a realm.
For details about Program/Change/Delete Realm, see "Programming the Realm".
AOF (Always On)
You can specify whether or not to use Auto Off.
The default setting is On.
Firmware Version
You can check the version of the software installed in this printer.
Network Security Level
For details about this function, consult your administrator.
Delete All Logs
For details about this function, consult your administrator.
Transfer Log Setting
For details about this function, consult your administrator.
| Copyright (C) 2010 |