When Paper is Jammed
If a paper jam occurs, the Alert indicator on the control panel flashes and one of the following messages appears on the control panel:
“Remove Misfeed Internal Path”
“Remove Misfeed Tray 1”
“Remove Misfeed Tray 2”
“Paper Misfeed Duplex Unit”
“Remove Misfeed Paper Exit”
Check the location and remove the jammed paper.
![]()
|
![]()
Misfed paper may be covered in toner. Be careful not to get toner on your hands or clothes.
Toner on prints made after removing misfed paper may be loose (inadequately fused). Make a few test prints until smudges no longer appear.
Do not forcefully remove misfed paper, it will tear. Torn pieces remaining inside the printer will cause further misfeeds and possibly damage the printer.
Paper jams can cause pages to be lost. Check your print job for missing pages and reprint any pages that did not print out.
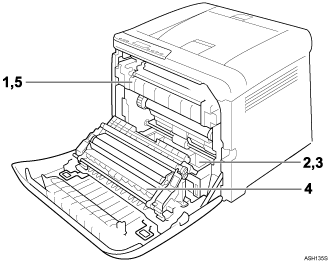
Remove Misfeed Internal Path
There is a paper jam in the fusing unit.
Remove Misfeed Tray 1
There is a paper jam in Tray 1.
Remove Misfeed Tray 2
There is a paper jam in Tray 2.
Paper Misfeed Duplex Unit
There is a paper jam in the duplex unit.
Remove Misfeed Paper Exit
There is a paper jam in the fusing unit.