Creases or Worm Tracks (on Thin Paper)
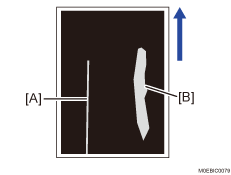
[A] Crease (Paper bent)
[B] Worm track (No creases but white ghosting on solid-fill parts)
Cause:
When solid-fill images are printed on both sides of thin paper, the paper has difficulty spreading in the main scan direction at the fusing nip on Side 2, resulting in creases or worm tracks.
Solution:

If you change the fusing nip width, the margin at the leading edge may be reduced, resulting in paper jams related to insufficient separation. In such a case, perform the solution described in see Paper Jams Occur with Crumpling of the Leading Edge When Thin Paper Is Used.
If the paper is not registered as custom paper, register the brand of the paper.
(a) Troubleshooting Flow A
 In [Detailed settings] for custom paper, select 1232: [Fusing Temperature], and then note down the value in [Heat Roller Temp].
1232-01: Fusing Temperature: BW/FC/FCS: Heat Roller Temp
1232-06: Fusing Temperature: FCS: Heat Roller Temp: Clear/Special
1232-07: Fusing Temperature: FCS: Heat Roller Temp: White
1232-08: Fusing Temperature: FCS: Heat Roller Temp: Metallic
1232-26: Fusing Temperature: S: Heat Roller Temp: Clear/Special
1232-27: Fusing Temperature: S: Heat Roller Temp: White
1232-28: Fusing Temperature: S: Heat Roller Temp: Metallic
1232-46: Fusing Temperature: BW/FC/FCS: Fuser Setting HQ: Heat Roller Temp
1232-51: Fusing Temperature: FCS: Fuser Setting HQ: Heat Roller Temp: Clear/Special
1232-52: Fusing Temperature: FCS: Fuser Setting HQ: Heat Roller Temp: White
1232-53: Fusing Temperature: FCS: Fuser Setting HQ: Heat Roller Temp: Metallic
1232-71: Fusing Temperature: S: Fuser Setting HQ: Heat Roller Temp: Clear/Special
1232-72: Fusing Temperature: S: Fuser Setting HQ: Heat Roller Temp: White
1232-73: Fusing Temperature: S: Fuser Setting HQ: Heat Roller Temp: Metallic
 Decrease the temperature setting for the fusing heat roller by 5°C.
 Print the image. Has the problem been resolved? (20 or more sheets of A4 paper)
 Check to see if the fusibility is within the acceptable range.
The required level of fusibility is as follows.
The printed image does not come off.
The toner does not come off even if it is lightly rubbed by a nail.
The toner does not come off even if it is rubbed by the cloth for cleaning the contact glass.
Yes | Go to the next step. |
No | Proceed to "Troubleshooting Flow B" |
 Check to see if creases and worms marks have disappeared.
Yes | Finished! |
No | Start over from Step 2. |
Select "Clear/Special" when using Neon Yellow, Neon Pink, or Invisible Red. Select "Metallic" when using Gold or Silver.
(b) Troubleshooting Flow B
In [Detailed settings] for custom paper, select 1241-01: [Fusing Nip Width Adjustment: Other than Envelope], and then check the value of the fusing nip width.
"Nip Width 3" or "Nip Width 4" | Go to the next step. |
Other than "Nip Width 3" or "Nip Width 4" | Proceed to Step 7. |
Select 1232: [Fusing Temperature], and then increase value for the fusing heat roller temperature by 10°C from the default value.
Go back to 1241-01: [Fusing Nip Width Adjustment: Other than Envelope], and then change it to "Nip Width 2".
Print the image. (20 or more sheets of A4 paper)
Check to see if the fusibility is within the acceptable range.
The required level of fusibility is as follows.
The printed image does not come off.
The toner does not come off even if it is lightly rubbed by a nail.
The toner does not come off even if it is rubbed by the cloth for cleaning the contact glass.
Yes | Go to the next step. |
No | Proceed to Step 7. |
 Check to see if creases and worm marks have disappeared.
Yes | Finished! |
No | Go back to "Troubleshooting Flow A", and repeat the procedure until the problem is resolved or until the fusibility becomes unacceptable. |
 In [Detailed settings] for custom paper, Select 1231: [Motor Speed], and then check the print speed.
[High] or [Middle] | Go to the next step. |
[Low] | Proceed to "Troubleshooting Flow C" |
 Reduce the print speed by one step.
For example, if the print speed is [High], lower it to [Middle], and if [Middle], lower it to [Low].
 Print the image. (20 or more sheets of A4 paper)
 Check to see if the fusibility is within the acceptable range.
Yes | Go to the next step. |
No | Proceed to Step 7. |
 Check to see if creases and worms marks have disappeared.
Yes | Finished! |
No | Go back to "Troubleshooting Flow A", and repeat the procedure until the problem is resolved or until the fusibility becomes unacceptable. |
(c) Troubleshooting Flow C
1241-01: [Fusing Nip Width Adjustment: Other than Envelope], and then change it to "Nip Width 1".
Select 1232: [Fusing Temperature], and then restore the fusing heat roller temperature to its default value.
Print the image. (20 or more sheets of A4 paper)
Check to see if the fusibility is within the acceptable range.
Yes | Go to the next step. |
No | No further improvement is likely. |
Check to see if creases and worm marks have disappeared.
Yes | Finished! |
No | Go back to "Troubleshooting Flow A", and repeat the procedure until the problem is resolved or until the fusibility becomes unacceptable. |