Paper Jams Occur with Crumpling of the Leading Edge When Thin Paper Is Used
Paper jams occur due to insufficient separation of thin paper.
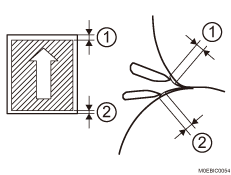
Leading edge margin
Trailing edge margin
Cause:
Due to a lack of the leading edge margin, the paper gets caught by the fusing separation plate on the fuser roller side, causing a paper jam with crumpling of the leading edge.
When duplex printing, the margin at the trailing edge of the paper on the front (Side 1) is lacking, causing the paper to get caught by the fusing separation plate on the pressurized side, causing a paper jam with crumpling of the leading edge.
Occurrence conditions:
When thin paper is used
When coated paper is used
Much toner is applied to the leading edge of the paper for a solid-fill image, etc.
The leading edge of the paper has some areas with insufficient margins.
When duplex printing too much toner is applied to the trailing edge of the paper on the front (Side 1) for a solid-fill image, etc.
When duplex printing is performed, the trailing edge of the paper on the front (Side 1) has some areas with insufficient margins (larger magnification).
Solution:
(a) If the width of the margin at the leading/trailing edge can be widened
 If the paper is not registered as custom paper, register the brand of the paper.
 In [Detailed settings] for custom paper, select 1239: [Margin] and increase the margin width by + 0.5 mm.
1239-01: Margin: BW/FC/FCS/S: Leading Edge
1239-02: Margin: BW/FC/FCS/S: Trailing Edge
1239-03: Margin: FCS: Leading Edge: Clear/Special
1239-04: Margin: FCS: Leading Edge: White
1239-05: Margin: FCS: Leading Edge: Metallic
1239-07: Margin: FCS: Trailing Edge: Clear/Special
1239-08: Margin: FCS: Trailing Edge: White
1239-09: Margin: FCS: Trailing Edge: Metallic
 Print the image and check if the paper jam has been resolved.
Yes | Finished! |
No | Repeat Step 1 to 2. If the problem persists even after reaching the upper limit, there is no other solution, so consider changing the paper. |

Select "Clear/Special" when using Neon Yellow, Neon Pink, or Invisible Red. Select "Metallic" when using Gold or Silver.
(b) If the width of the margin at the leading/trailing edge cannot be widened
Check if it is possible to change the image position.
Yes | Go to the next step. |
No | There is no other solution, so consider changing the paper. |
If the paper is not registered as custom paper, register the brand of the paper.
In [Detailed settings] for custom paper, select 1239: [Margin] and increase the margin width by + 0.5 mm.
1104-02: Machine: Image Position: Image Position Gap: Image Position: Side 1: With Feed
1104-04: Machine: Image Position: Image Position Gap: Image Position: Side 2: With Feed
 Print the image and check if the paper jam has been resolved.
Yes | Finished! |
No | Repeat Step 3 to 4. If the problem persists even after reaching the upper limit, there is no other solution, so consider changing the paper. |