Copying at the Image Quality Suitable for the Original
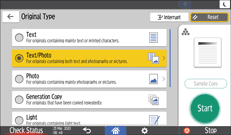
Specify the type of original, whether it is comprised mostly of text or contains photos (Original Type). Also, adjust the image density to copy the original at better quality.
Specifying the Original Type
 Press [Copy] on the Home screen.
 Press [Original Type] on the Copy screen.

If the key is not displayed, select it from [Original Setting].
 Select the original type.

When you select [Text/Photo] or [Photo], further select [Printed Photo], [Glossy Photo], or [Copied Photo].
 Place the original.
 Press [Start].

If the shaded parts of your copies appear uneven, select [Text] or [Photo] for a smoother printout.
[Highlight Pen] is a setting suitable for black and white originals.
When [Highlight Pen] is selected, the color adjustment functions, such as [Erase Color] and [Adjust Color], may not be performed.
Some colors of highlighter pens may be copied in different colors or may not appear in the outputs because the colors are difficult to reproduce.
[Shiny Materials] is a setting suitable for metals and glossy originals.
You can change the default value when you press [Original Type] on the [Original Setting] screen.
Adjusting the Image Density
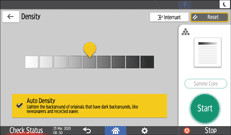
There are three methods for adjusting the image density as described below.
Adjusting Method | Settings | Results |
|---|---|---|
Adjust the contrast of the entire original. | Adjust the image density manually. |  |
Decrease the base color of the original. | Adjust the image density automatically. |  |
Adjust the contrast of the part from which the base color of the original is deleted. | Combine the manual and automatic image density adjustments. |  |
 Press [Copy] on the Home screen.
 Press [Density] on the Copy screen.

If the key is not displayed, select it from [Original Setting].
 Adjusting the image density

To adjust the density of the entire original manually, drag
 right and left. Dragging to the left decreases the density, and to the right increases it.
To decrease the base color of the original, select the [Auto Density] check box.
To adjust the contrast of the part from which the base color of the original is deleted, adjust the density by dragging
 right and left, and then select the [Auto Density] check box.
 Place the original.
 Press [Start].

You can also adjust the image density by dragging
 on the [Density] key right and left on the Copy screen.
When selecting [Auto Density], images 10 mm from the edges of the original may not be colored.
The density of the images in a printout may vary when you copy photos or images pasted to the original.
