
Setting Up With the RICOH Multifunction Printer
Settings must be made from the Smart Operation Panel of the RICOH multifunction printer to use this system.
The flow to make settings from the Smart Operation Panel of the RICOH multifunction printer is shown below.
Installing the Latest Functions in the RICOH Multifunction Printer
RICOH Always Current Technology Ver. 1.1 or later that contains the functions for this system must be installed in the RICOH multifunction printer in order to use this system.
For details about the installation method for the RICOH Always Current Technology, see the "Instruction Manual" application site.
Enabling the Intelligent Voice Control Function
Enabling the Intelligent Voice Control function requires configuration work by a customer engineer.
Setting Up the Intelligent Voice Control Function
Follow the procedure below to set up the Intelligent Voice Control function.
![]() Log in as machine administrator.
Log in as machine administrator.
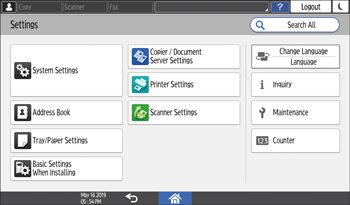
![]() Tap [Settings].
Tap [Settings].
When [Switch Screen Type] is set to [Standard], the following [Settings] screen is displayed.
When [Switch Screen Type] is set to [Classic], the following [Settings] screen is displayed.

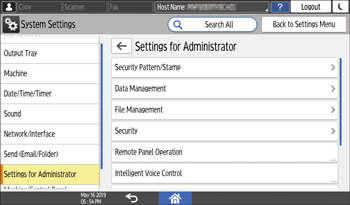
![]() When [Switch Screen Type] is set to [Standard], tap in the order [System Settings]
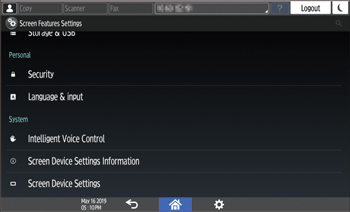
When [Switch Screen Type] is set to [Standard], tap in the order [System Settings] [Settings for Administrator]. When [Switch Screen Type] is set to [Classic], tap in the order [Screen Feature Settings][Intelligent Voice Control].
The screen when [Switch Screen Type] is [Standard]
The screen when [Switch Screen Type] is [Classic]
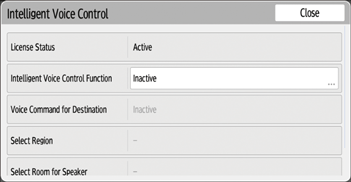
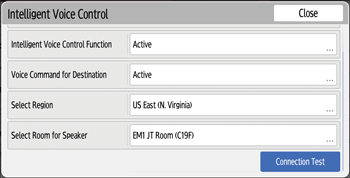
The [Intelligent Voice Control] screen appears.
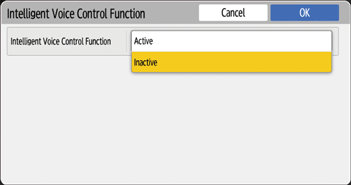
![]() Tap [Intelligent Voice Control Function].
Tap [Intelligent Voice Control Function].
![]() Change [Inactive] to [Active] and tap [OK].
Change [Inactive] to [Active] and tap [OK].
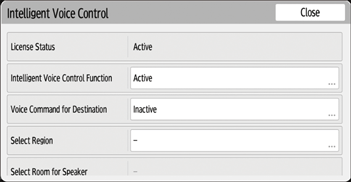
The display returns to the [Intelligent Voice Control] screen and [Intelligent Voice Control Function] is displayed as [Active].
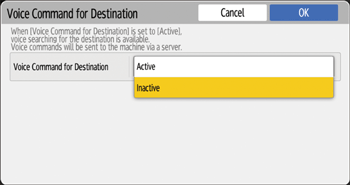
![]() To use destination information with voice commands, tap [Voice Command for Destination].
To use destination information with voice commands, tap [Voice Command for Destination].
![]() Change [Inactive] to [Active] and tap [OK].
Change [Inactive] to [Active] and tap [OK].
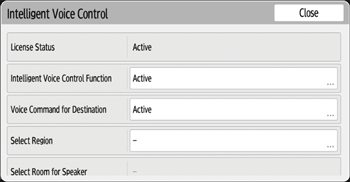
The display returns to the [Intelligent Voice Control] screen and [Voice Command for Destination] is displayed as [Active].
![]() Tap [Select Region].
Tap [Select Region].
![]() Select [US East (N.Virginia)] in the menu and tap [OK].
Select [US East (N.Virginia)] in the menu and tap [OK].
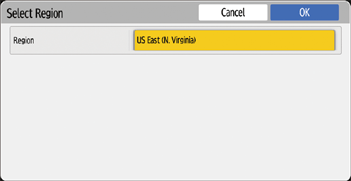
The display returns to the [Intelligent Voice Control] screen and [Select Region] is displayed as [US East (N.Virginia)].
![]() Tap [Select Room for Speaker].
Tap [Select Room for Speaker].
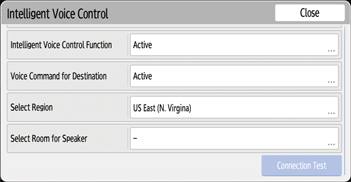
The [Select Room for Speaker] screen appears.
![]() Tap [Account].
Tap [Account].

![]() Enter the AWS Access Key ID and Secret Access Key in [Access Key ID] and [Secret Access Key] for Alexa for Business Account.
Enter the AWS Access Key ID and Secret Access Key in [Access Key ID] and [Secret Access Key] for Alexa for Business Account.
For more information about the AWS Access Key ID and Secret Access Key, see the csv file downloaded in Creating the user to set Alexa for Business.
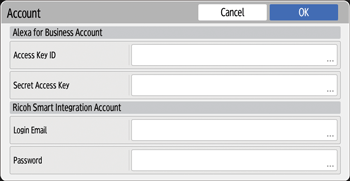
![]() Enter the email address and password of your RICOH Smart Integration Account in [Login Email] and [Password] for [RICOH Smart Integration Account], and tap [OK].
Enter the email address and password of your RICOH Smart Integration Account in [Login Email] and [Password] for [RICOH Smart Integration Account], and tap [OK].
The display returns to the [Select Room for Speaker] screen.
![]()
When you tap [OK], communication to confirm the account will be carried out. If you receive a communication error after entering the wrong RICOH Smart Integration Account email address and password, re-enter your email address and password.
The Access Key ID, Secret Access Key, and RICOH Smart Integration account information entered in the multifunction printer will not be displayed when the device is restarted.
![]() Finally, tap [Select Room].
Finally, tap [Select Room].
The [Select Room] screen appears.
![]() Select the room to link to the smart speaker, and tap [OK].
Select the room to link to the smart speaker, and tap [OK].
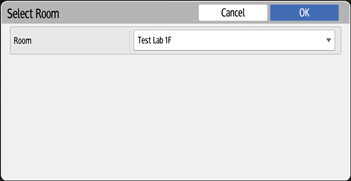
The display returns to the [Select Room for Speaker] screen and the set room is displayed.
![]() Tap [OK] to return to the [Intelligent Voice Control] screen.
Tap [OK] to return to the [Intelligent Voice Control] screen.
![]() Tap [Connection Test].
Tap [Connection Test].
If no valid certificate is installed in the RICOH multifunction printer, a screen appears to acquire the certificate. Enter the RICOH Smart Integration Account email address and password in the screen, and tap [OK].
If the test ends normally, the message “Connecting with the smart speaker has succeeded.” is displayed.
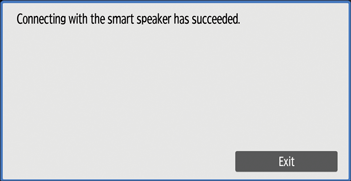
![]() Tap [Exit].
Tap [Exit].
The Connection Test screen closes.
![]() Tap [Close].
Tap [Close].
The [Intelligent Voice Control] screen closes.
![]() Log out.
Log out.