Guide to Names and Functions of Components

- Do not obstruct the machine's vents. Doing so can result in fire as the internal components are overheated.
Region A and Region B symbols
 (mainly Europe and Asia), (mainly Europe), or (mainly Asia)
 (mainly North America)
Differences in the functions of Region A and Region B models are indicated by two symbols.
Read the information indicated by the symbol that corresponds to the region of the model you are using.
Exterior: Front and Left View
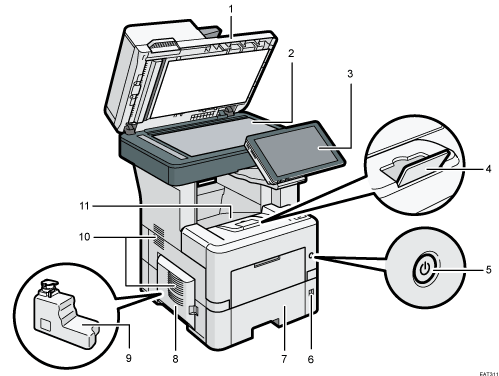
Auto Document Feeder (ADF)
Lower the cover over originals placed on the exposure glass.
If you load a stack of originals in the ADF, the ADF will automatically feed the originals one by one.
Exposure glass
Place originals facedown here.
Control panel
Tray extension
Pull this fence to prevent paper from falling off.
Main power switch
To turn the power on and off, press the main power switch.
Paper size dial
Use this dial to specify the paper size. To use a paper size that is not indicated on the paper size dial, set the dial to "
 ". If this is the case, set the paper size using the control panel.
Paper tray
Standard paper tray. Load paper here.
Left cover
Open to access the waste toner bottle.
Waste toner bottle
Waste toner is collected here. Replace the bottle when it is full.
Vents
Holes for ventilating the inside the machine to prevent the internal components from overheating.
Standard tray
Copied/printed paper and received fax pages are delivered here.
Exterior: Front and Right View
IM 550F/IM 600F
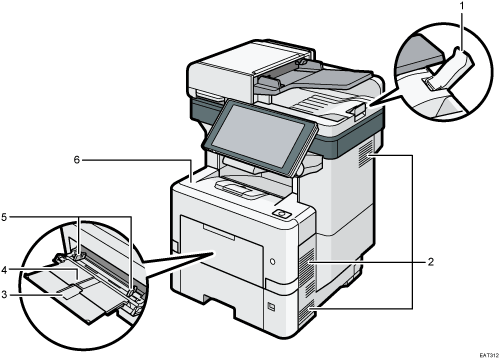
ADF tray extender
Pull this extender out to prevent originals larger than A4
 or 81/2 × 11 from falling.
Vents
Holes for ventilating the inside the machine to prevent the internal components from overheat.
Extender for the bypass tray
Pull this extender out when loading paper larger than A4
or 81/2 × 11.Bypass tray
Use the tray to copy or print on OHP transparencies, adhesive labels, and paper that cannot be loaded in the paper trays.
Paper guides
When loading paper in the bypass tray, align the paper guides with the edges of the paper.
Front cover
Open to access the inside of the machine and remove jammed paper.
Open here to replace the print cartridge.
IM 600SRF
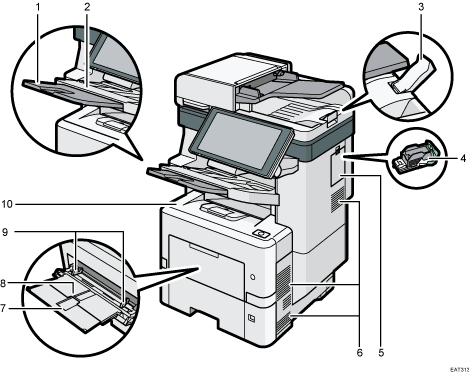
Extender for the finisher shift tray
Pull this extender out when loading paper larger than A4
or 81/2 × 11.Finisher shift tray
Sorted or stapled papers are delivered here.
ADF tray extender
Pull this extender out to prevent originals larger than A4
or 81/2 × 11 from falling.Staple cartridge
Staple cartridge for the finisher. Replace the cartridge when the staples run out.
Right cover
Open this cover to replace the staple cartridge.
Vents
Holes for ventilating the inside the machine to prevent the internal components from overheating.
Extender for the bypass tray
Pull this extender out when loading paper larger than A4
or 81/2 × 11.Bypass tray
Use the tray to copy or print on OHP transparencies, adhesive labels, and paper that cannot be loaded paper trays.
Paper guides
When loading paper in the bypass tray, align the paper guides with the edges of the paper.
Front cover
Open to access the inside of the machine and remove jammed paper.
Open here to replace the print cartridge.
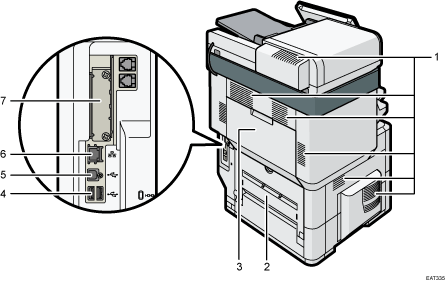
Exterior: Rear and Left View
IM 550F/IM 600F
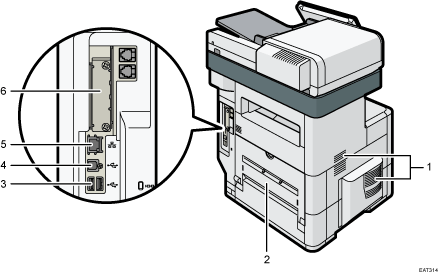
Vents
Holes for ventilating the inside the machine to prevent the internal components from overheat.
After large-volume printing, the ventilation fan may continue to work to lower the temperature inside the machine.
Rear Cover
Open to access the inside of the machine.
USB2.0 Interface Type A
Use the port to connect the IC card authentication device.
USB2.0 Interface Type B
Use the port to connect the machine and the computer with the USB cable.
Ethernet port
Use a network interface cable to connect the machine to a network.
Optional interface board slot
Optional interface boards can be inserted.
Insert an optional wireless LAN interface board, IEEE 1284 interface board, Device server or File format converter.
IM 600SRF
Vents
Holes for ventilating the inside the machine to prevent the internal components from overheat.
After large-volume printing, the ventilation fan may continue to work to lower the temperature inside the machine.
Rear cover
Open to access the inside of the machine.
Rear upper cover
Open to remove jammed paper.
USB2.0 Interface Type A
Use the port to connect the IC card authentication device.
USB2.0 Interface Type B
Use the port to connect the machine and the computer with the USB cable.
Ethernet port
Use a network interface cable to connect the machine to a network.
Optional interface board slot
Optional interface boards can be inserted.
Insert an optional wireless LAN interface board, IEEE 1284 interface board, Device server or File format converter.

The fan inside the machine near the vents may continue running to cool the machine after a print job.
Interior: Front View
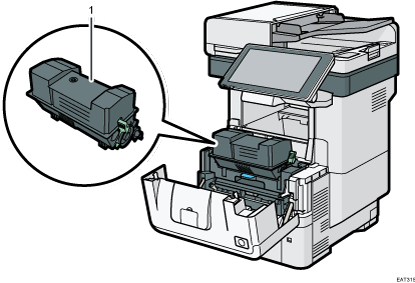
Print cartridge
Messages appear on the screen when the print cartridge needs to be replaced, or a new cartridge needs to be prepared.
Guide to Functions of the Machine's Internal Options
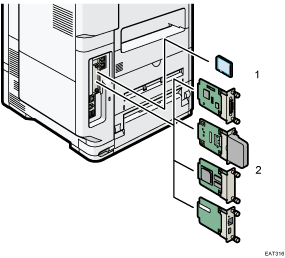
SD memory card options
VM card
With this card, you can install embedded software applications.
XPS card
Allows you to print XPS files.
IPDS unit
Allows you to print using Intelligent Printer Data Stream (IPDS).
PostScript3 unit
Allows you to output using genuine Adobe PostScript3.
Fax connection unit
Allows you to send and receive faxes via a different machine that has the fax unit installed.
OCR unit
Allows you to use OCR unit.
Optional interface units
Wireless LAN board
Allows you to communicate over a wireless LAN.
IEEE 1284 interface board
Allows you to connect to an IEEE 1284 cable.
Device server
Allows you to add an Ethernet port to the machine and use two IP addresses at the same time.
File format converter
Allows you to download the documents that are stored in the Document Server.
To install the following option, contact your service representative.
Enhanced Security HDD
Allows you to enhance the security of the hard disk by using an encryption function that is compliant with FIPS 140-2.
If you want to use two or more SD cards that can be inserted in the same slot, contact your sales or service representative.