Printing on Envelopes
Load envelopes in the bypass tray or paper tray.
Load envelopes in the machine and change the Tray Paper Settings in the Control Panel.
Printing on Envelopes Loaded on the Bypass Tray (Settings Screen Type: Standard)
 Load an envelope in the Bypass Tray.
Types and orientations of envelopes | Bypass Tray |
|---|---|
Side-opening envelopes  | 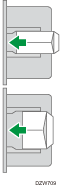 Flap: open Bottom side of the envelope: left Printing surface: lower side |
Side-opening envelopes  | 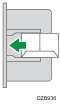 Flap: close Bottom side of the envelope: back Printing surface: lower side |


 On the Home screen, press [Settings].
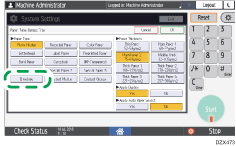
 On the Settings screen, press [Tray/Paper Settings].
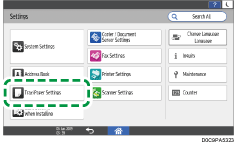
 Press [Paper Size/Paper Type].
 Press [Bypass Tray]
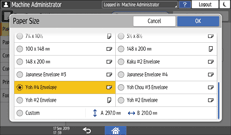
![]() [Paper Size: Printer], and then select the size of the envelopes.
[Paper Size: Printer], and then select the size of the envelopes.
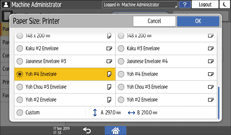
If the size of the loaded envelope is not included in the list, select [Custom] and enter the value.
 Press [OK].
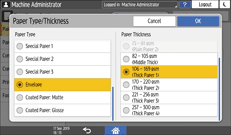
 Press [Paper Type/Thickness], and then select [Envelope] from "Paper Type".
Also, select the thickness of the loaded envelopes from "Paper Thickness".
 Press [OK] twice.
 After completing the configuration, press [Home] (
 ).
).
 Open a document to print in the computer, and display the setting screen of the printer driver from the print menu application.
 Specify the paper size and paper type.
Windows
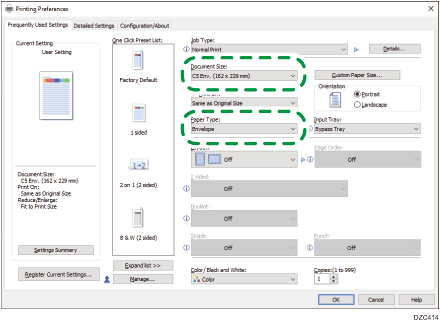
Document Size: Select the envelope size. If the envelope size is not included among the options, enter the value in [Custom Paper Size...].
Paper Type: [Envelope]
You can specify a custom paper size, which is commonly used as the option of the Document Sizes.
OS X/macOS
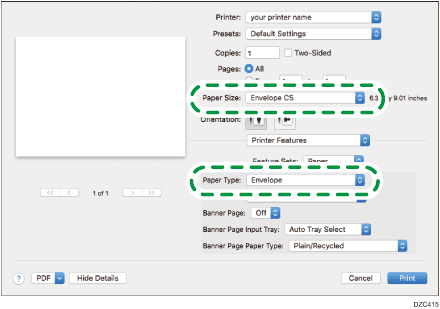
Paper Size: Select the envelope size. If the envelope size is not included among the options, select [Manage Custom Sizes] and enter the value.
Paper Type: [Envelope]
 Execute printing.
Printing on Envelopes Loaded in the Paper Tray (Settings Screen Type: Standard)
Load an envelope in the Paper Tray.
Types and orientations of envelopes | Tray 2 to 4 |
|---|---|
Side-opening envelopes | 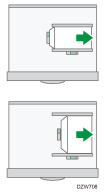 Flap: open Bottom side of the envelope: right Printing surface: upper side |
Side-opening envelopes | 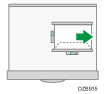 Flap: close Bottom side of the envelope: back Printing surface: upper side |
On the Home screen, press [Settings].
On the Settings screen, press [Tray/Paper Settings].
Press [Paper Size/Paper Type], and then select the tray in which the envelopes are loaded.
Press [Paper Size], and select the size of the envelopes.
If the size of the loaded envelope is not included in the list, select [Custom] and enter the value.
Press [OK].
Press [Paper Type/Thickness], and then select [Envelope] from "Paper Type".
Also, select the thickness of the loaded envelopes from "Paper Thickness".
Press [OK] twice.
After completing the configuration, press [Home] ().
Open a document to print in the computer, and display the setting screen of the printer driver from the print menu application.
Specify the paper size and paper type.
Windows
Document Size: Select the envelope size. If the envelope size is not included among the options, enter the value in [Custom Paper Size...].
Paper Type: [Envelope]
You can specify a custom paper size, which is commonly used as the option of the Document Sizes.
OS X/macOS
Paper Size: Select the envelope size. If the envelope size is not included among the options, select [Manage Custom Sizes] and enter the value.
Paper Type: [Envelope]
Execute printing.
Printing on Envelopes (Settings Screen Type: Classic)
Load an envelope in the Bypass Tray or the Paper Tray.
Types and orientations of envelopes | Tray 2 to 4 | Bypass Tray |
|---|---|---|
Side-opening envelopes | Flap: open Bottom side of the envelope: right Printing surface: upper side | Flap: open Bottom side of the envelope: left Printing surface: lower side |
Side-opening envelopes | Flap: close Bottom side of the envelope: back Printing surface: upper side | Flap: close Bottom side of the envelope: back Printing surface: lower side |
On the Home screen, press [Settings].
Press [Tray Paper Settings]![]() [Tray Paper Size] or [Printer Bypass Paper Size], and then select the size of the envelopes.
[Tray Paper Size] or [Printer Bypass Paper Size], and then select the size of the envelopes.

If the size of the loaded envelope is not included in the list, select [Custom Size] and enter the value.
Press [OK].
Press "Paper Type" of the tray with loaded the envelopes, and then select [Envelope].
After completing the configuration, press [Home] ().
Open a document to print in the computer, and display the setting screen of the printer driver from the print menu application.
Specify the paper size and paper type.
Windows
Document Size: Select the envelope size. If the envelope size is not included among the options, enter the value in [Custom Paper Size...].
Paper Type: [Envelope]
You can specify a custom paper size, which is commonly used as the option of the Document Sizes.
OS X/macOS
Paper Size: Select the envelope size. If the envelope size is not included among the options, select [Manage Custom Sizes] and enter the value.
Paper Type: [Envelope]
Execute printing.