Applying Different Print Settings Depending on the Document Type
You can select the print quality that is suitable for the image to print such as photograph, POP display, or CAD drawing.
Specifying Print Quality (OS X/macOS)
Select [Print Quality] on "Feature Sets" of [Printer Features] to configure the settings.
 Open a document to print on the computer, and display the setting screen of the printer driver from the print menu in the application.
 Specify Paper Size, Orientation, Paper Type, and other settings.
 On [Print Quality] on "Feature Sets", specify the print quality.
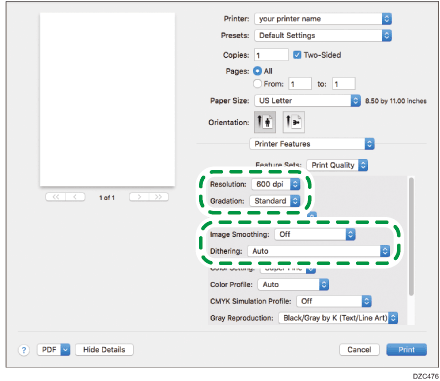
Dithering: Specify the following items according to the document to print.
Auto: The machine determines the document type automatically and applies a suitable print setting.
Photographic: Suitable for a photograph or an image containing color gradation.
Text: Suitable for text and charts.
User Setting: Enables the halftone settings when using an application that supports halftone settings.
Reduce Missing Colors and Blurring: Suitable for thin lines that are light in density or text.
Resolution: The larger the value, the longer the machine takes to print high quality image.
Gradation: Specify the quality level depending on the resolution.
Image Smoothing: Prints text and pictures with a smooth outline.
 After completing the configuration, click [Print] to print.

The halftone setting on [Custom] is enabled only when the machine is equipped with the optional PostScript 3 unit. When using the standard PS3, the halftone effect is equal to the setting of [Auto].