Binding Printed Sheets
You can use the various functions to finish the printed sheets as a book.
Select a combination of functions to bind the printed sheets as needed.

You need to attach the optional unit to the machine according to the function.
Types of Binding
Magazine
Arrange four original pages as shown below and print them on a sheet. Stack all printed sheets and fold them in half to arrange the pages in the order of the page numbers.
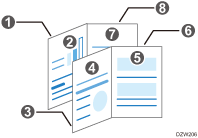
Staple the stacked sheets in the center to finish as a booklet. Magazine is suitable for when the booklet finisher is attached to the machine.
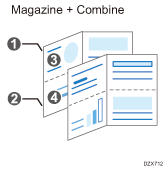
Magazine and Combine
You can arrange multiple pages of originals on a page of a bound book printed by specifying Magazine.
Functions for Binding
Cover sheet
You can insert front and back cover sheets in the printed sheets. Paper for the cover sheet is fed from a different tray from that of the main paper. You can use paper of a different quality for the cover sheet.
The cover sheet function is enabled in Windows.
The first to second pages and the last page of a document can be printed as the cover sheets.
You can insert a blank cover sheet.
Half fold
The printed sheets can be folded in half.
You can finish printed sheets as a book with double-page spreads when combining Half fold with Magazine of Binding.
To fold printed sheets in half, attach the booklet finisher to the machine.
See the section below for details about paper size, paper weight, or number of sheets that can be folded in half.
You cannot use the following types of paper for Half fold:
Label Paper
Coated Paper
Envelopes
Printed paper fed from the bypass tray
Binding the Print Sheets (Windows)
Specify the settings on the [Frequently Used Settings] tab.
 Open a document to print on the computer, and display the setting screen of the printer driver from the print menu in the application.
 Specify Paper Size, Paper Type, Orientation and other settings.
 In "Booklet", select [Magazine].
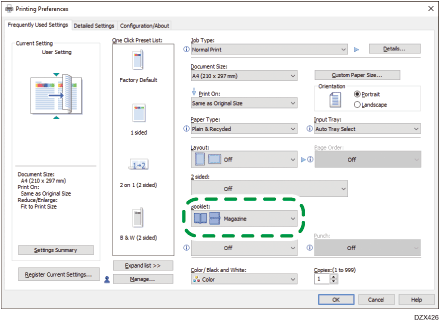
 After completing the configuration, click [OK] to print.
Binding the Printed Sheets (OS X/macOS)
Configure the settings in [Finishing] on "Feature Sets" of [Printer Features].
Open a document to print on the computer, and display the setting screen of the printer driver from the print menu in the application.
Specify Paper Size, Orientation, Paper Type, and other settings.
On [Finishing] of "Feature Sets", click Booklet to select the opening direction of the bound paper.
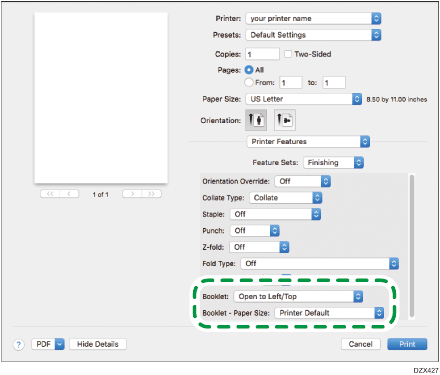
Booklet: Select the opening direction of the bound booklet.
Booklet - Paper Size: Specify the paper size to use for Booklet.
After completing the configuration, click [Print] to print.

If you specify a custom size paper for Booklet in the PostScript 3 printer driver and the length of the short edge of the paper is equal to or shorter than half the length of the long edge of the paper, the job will be canceled.
Inserting Cover Sheet (Windows) (Settings Screen Type: Standard)
Configure the settings on the [Cover/Slip/Designate] menu of the [Detailed Settings] tab.
Load the paper to use as cover sheets into the paper tray.
Loading Paper into the Paper Tray
Use a paper tray other than the one for printing the document. Load paper of the same size in the same orientation as the document.
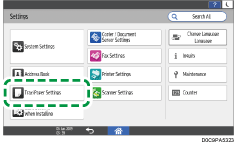
On the Home screen, press [Settings].
On the Settings screen, press [Tray/Paper Settings].
Press [Common Settings/Others]![]() [Cover Sheet Tray] to display the cover sheet tray setting screen.
[Cover Sheet Tray] to display the cover sheet tray setting screen.
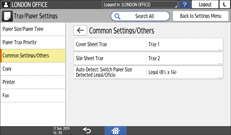
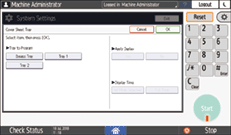
Configure the following settings on the [Cover Sheet Tray] screen.
Tray to Register: Select the tray loaded with the paper for cover sheets.
Display Time: Select [Full Time] if you always use the selected paper tray to load cover sheet paper when you use the Copy function. Select [At Mode Selected] if you use the selected paper tray to load cover sheet paper only when the cover sheet function is specified.
Apply Duplex: To print on both sides of a cover sheet, select [Yes].
 Press [OK].
 After completing the configuration, press [Home](
 ).
).
 Open a document to print on the computer, and display the setting screen of the printer driver from the print menu in the application.
 Specify Paper Size, Paper Type, Orientation and other settings to print the document.
 Configure the settings of the cover sheet on the [Cover/Slip/Designate] menu of the [Detailed Settings] tab.
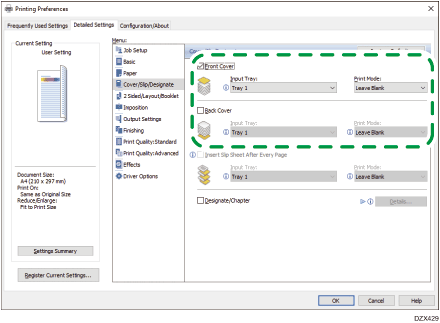
Front Cover/Back Cover: Select the paper tray specified on the control panel, and then specify whether to print on the cover sheet.
 After completing the configuration, click [OK] to print.
Inserting Cover Sheet (Windows) (Settings Screen Type: Classic)
Configure the settings on the [Cover/Slip/Designate] menu of the [Detailed Settings] tab.
Load the paper to use as cover sheets into the paper tray.
Loading Paper into the Paper Tray
Use a paper tray other than the one for printing the document. Load paper of the same size in the same orientation as the document.
On the Home screen, press [Settings].
Press [Tray Paper Settings]![]() [Cover Sheet Tray] to display the cover sheet tray setting screen.
[Cover Sheet Tray] to display the cover sheet tray setting screen.
Tray to Program: Select the tray loaded with the paper for cover sheets.
Apply Duplex: To print on both sides of a cover sheet, select [Yes].
Display Time: Select [Full Time] if you always use the selected paper tray to load cover sheet paper when you use the Copy function. Select [At Mode Selected] if you use the selected paper tray to load cover sheet paper only when the cover sheet function is specified.
Press [OK].
After completing the configuration, press [Home]().
Open a document to print on the computer, and display the setting screen of the printer driver from the print menu in the application.
Specify Paper Size, Paper Type, Orientation and other settings to print the document.
Configure the settings of the cover sheet on the [Cover/Slip/Designate] menu of the [Detailed Settings] tab.
Front Cover/Back Cover: Select the paper tray specified on the control panel, and then specify whether to print on the cover sheet.
After completing the configuration, click [OK] to print.