Installing the Printer Driver for LPR Printing
To print using the LPR port, add the LPR port and install the printer driver.

Select the "LPR Port Monitor" check box of [Print and Document Services] in [Turn Windows features on or off] in advance.
Installing the Printer Driver from the CD-ROM
 Set the CD-ROM in the computer.
If the installer does not start automatically, double-click [Setup.exe] in the root directory of the CD-ROM.
 Select a language, and then click [OK].
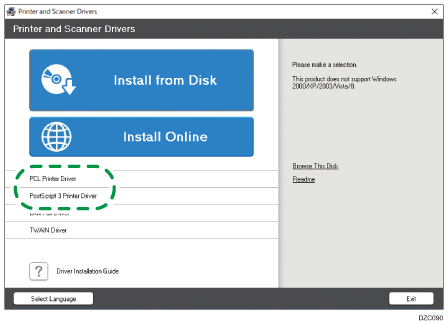
 Click [PCL Printer Driver] or [PostScript 3 Printer Driver].
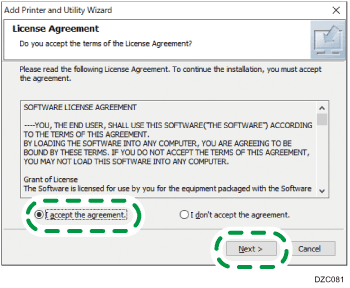
 On the "License Agreement" screen, select [I accept the agreement], and then click [Next]
 Select the printer driver you want to install, and then click [Next].
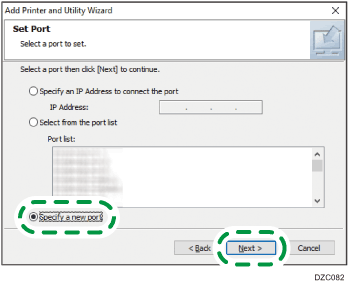
 Select [Specify a new port], and then click [Next].
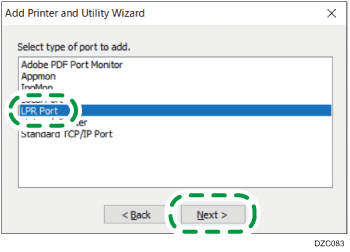
 On the "Add Printer and Utility Wizard" screen, select [LPR Port] and click [Next].
 Enter the information of the port and click [OK].
Name or address of server providing lpd: Enter the IP address of the machine.
Name of printer or print queue on that server: Enter "lp".
 Select the [Printer Name], and then open the menu tree.
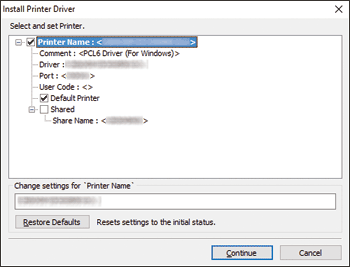
 Check that "(IP address of the machine): lp" is displayed in [Port].
 Specify the name of the printer to install, and whether to use it as the default printer.
 Click [Continue.]
Printer driver installation starts.
 Click [Finish].
When you are prompted to restart your computer, restart it by following the instructions that appear.
Installing the Printer Driver from the Downloaded File
Double-click the downloaded file.
Confirm the location to install the driver, and then click [Install].
If the "Security Warning" screen is displayed, click [OK].
If the "User Account Control" screen is displayed, click [Yes] or [Allow].
On the "End User License Agreement" screen, select [Agree], and then click [Next].
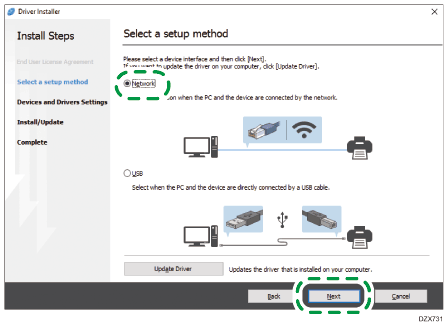
Select [Network], and then click [Next].
Click [Click if you cannot find the device].
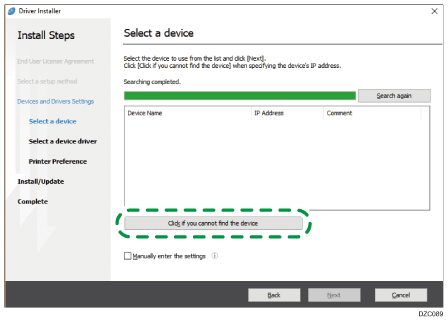
If the "Network Connection Error" screen is displayed, click [OK].
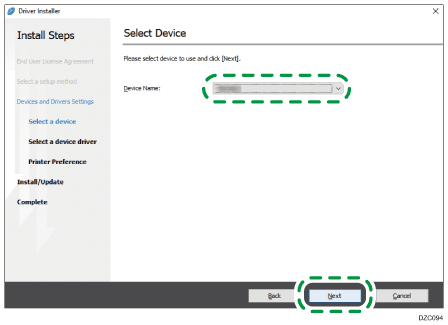
Select [Specify device name], and then click [Next].
Select the machine to use, and then click [Next].
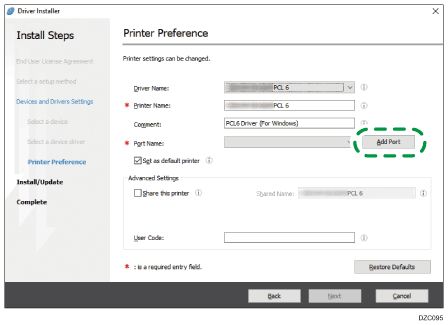
On the "Printer Preference" screen, click [Add Port].
Select [LPR Port], and then click [OK].
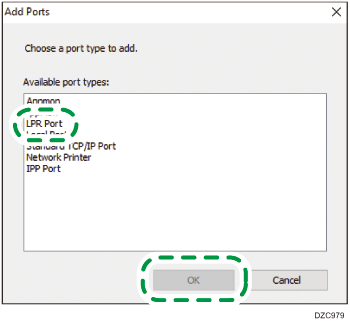
Enter the information of the port and click [OK].
Name or address of server providing lpd: Enter the IP address of the machine.
Name of printer or print queue on that server: Enter "lp".
Check that "(IP address of the machine): lp" is displayed in “Port Name” on the "Printer Preference" screen.
Configure the items of "Advanced Settings" if required, and then click [Next].
Printer driver installation starts.
For the PCL 6 driver, proceed to Step 14.
Consult your administrator if the advanced settings are necessary.
Click [Open Printer Properties].
 On the [Accessories] tab, check that the options installed on the machine are selected, and then click [OK]
![]() [Next].
[Next].
 When the installation is complete, click [Finish].