Saving Documents from the Copy, Fax, or Scanner Screen
You can save documents in the Document Server from the Copy, Fax, or Scanner screens.
You can also confirm saved documents in the preview screen, and then send them.
IM C530 series does not support this function.
Function | Up to version 2.0 | Version 2.1 |
|---|---|---|
Saving documents from the Copy, Fax, or Scanner screen | Unavailable | Available |
Preview of the saved document | Unavailable | Available |
Sending of the saved document | Unavailable | Available |
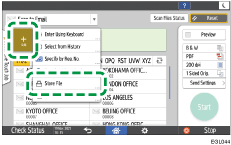
Saving documents from the Copy screen
 Press [Original Setting/Store File] on the Copy screen.
 Press [Store File].
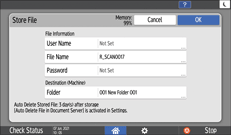
 Specify the file name, user name, and other settings.
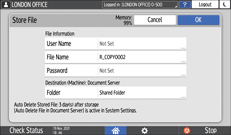
User Name: Specify the user name displayed as the owner of the document. Select a user from the address book or enter the name.
File Name: Specify the name of the scanned document. If you do not specify the file name, a name such as "R_COPY0001" or "R_COPY0002" is assigned automatically.
Password: Specify the password required for printing the document. You can specify a number of 4 to 8 digits as the password.
Folder: Select the "Shared Folder" created in the factory default configuration or a user folder created by a user to store the document. To select a user folder, create it in advance. If you select a password-protected folder, enter the password, and then press [OK].
 Press [OK].
 Specify the scanning conditions such as original type or original size.
 Place the original.
 Press [Start].
When you place the original on the exposure glass, saving document after press [Finish Scn] after scanning all originals.
 After saving the document, press [Reset].
Saving documents from the Fax screen
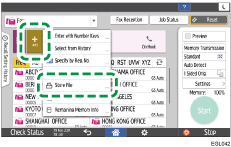
Press  on the Fax screen, and then select [Store File].
Specify the file name, user name, and other settings.
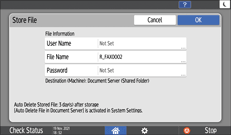
User Name: Specify the user name displayed as the owner of the document. Select a user from the address book or enter the name.
File Name: Specify the name of the scanned document. If you do not specify the file name, a name such as "R_FAX0001" or "R_FAX0002" is assigned automatically.
Password: Specify the password required for editing or sending the document. You can specify a number of 4 to 8 digits as the password.
Press [OK].
Specify the scanning conditions such as original type or scan size.
If you send documents simultaneously as they are saved, also set the destination.
Place the original.
Press [Start].
When you place the original on the exposure glass, saving document after press [Finish Scn] after scanning all originals.
After saving the document, press [Reset].
Saving documents from Scanner screen
Press  on the Scanner screen, and then select [Store File].
Specify the file name, user name, and other settings.
User Name: Specify the user name displayed as the owner of the document. Select a user from the address book or enter the name.
File Name: Specify the name of the scanned document. If you do not specify the file name, a name such as "R_SCAN0001" or "R_SCAN0002" is assigned automatically.
Password: Specify the password required for printing the document. You can specify a number of 4 to 8 digits as the password.
Folder: Select the "Shared Folder" created in the factory default configuration or a user folder created by a user to store the document. To select a user folder, create it in advance. If you select a password-protected folder, enter the password, and then press [OK].
Press [OK].
Specify the scanning conditions such as original type or scan size.
Set the destination to which to send documents at the same time as they are saved.
Place the original.
Press [Start].
When you place the original on the exposure glass, saving document after press [Finish Scn] after scanning all originals.
After completing saving the document, press [Reset].
Operating/Sending Saved Documents
Operating/sending documents saved from the Fax screen
Press [Settings] on the fax screen.Press [Select Stored File]. Operate documents and specify sending methods.
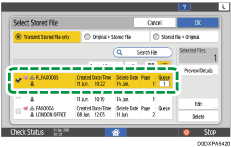
When sending only saved documents
Select [Transmit Stored File only].
Select the documents that you want to send, and then press [OK].
Specify the destination, and then press [Start].
When sending a combination of saved documents and originals
Select [Original + Stored File] or [Stored file + Original].
[Original + Stored File] send originals first, [Stored file + Original] send saved documents first.
Select documents which you want to send, and then press [OK].
Place the original.
Specify the scanning conditions and destination, and then press [Start].
To check stored documents on the screen
Select the document you want to check, and then press [Preview/Details].
After checking, press [Exit].
To edit stored documents
Select the document you want to edit, and then press [Edit].
You can change the user name or set a password.
After editing, press [Exit].
To delete stored documents
Select the document you want to delete, and then press [Delete].
Press [Delete] on the confirmation screen.
Operating/sending documents saved from the Scanner screen
Press [Send Settings] on the scanner screen.Press [Select Stored File].Select the storage destination folder to which to send and check documents, and then press [Open].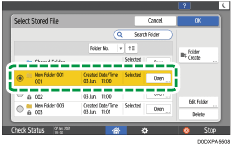 Operate a document or specify sending method.
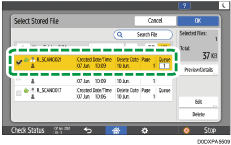
To send stored documents
Select the document you want to send, and then press [OK].
Specify the destination, and then press [Start].
To check stored documents on the screen
Select the document you want to check, and then press [Preview/Details].
After checking, press [Exit].
To edit stored documents
Select the document you want to edit, and then press [Edit].
You can change the user name or set a password.
After editing, press [Exit].
To delete stored documents
Select the document you want to delete, and then press [Delete].
Press [Delete] on the confirmation screen.

[Access Privileges] appears instead of [User Name] in the following cases. You can specify user or group access privileges for documents be saved.
When basic authentication, Windows authentication, or LDAP authentication is enabled
When authentication management of Copy, Fax, or Scanner is enabled in [Application Authentication Management]
When you are logged in to the machine as a user or file administrator