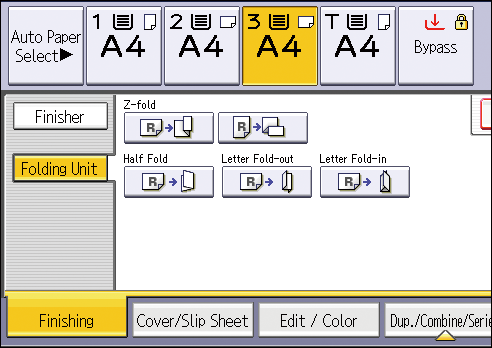
Fold
Available folding functions vary depending on the type of finisher and folding unit installed on your machine. For the finishers and folding units that are available, see User Guide of your machine.

To use this function, the folding unit is required.
You cannot use the bypass tray with this function.

Copying will stop if the number of copies exceeds tray capacity. If this happens, remove copies from the folding unit tray to resume copying.
The printed side of the paper may occasionally be scratched or stained with toner depending on the paper and the conditions of the machine's environment.
Print quality over fold lines might be reduced. This is due to cracking within the fused toner. Loss of surface along fold lines can also occur with some types of paper. To avoid possible wastage, print a single test sheet before beginning a print run.
The capacity of the folding unit tray may vary depending on the fold settings and the condition of the paper.
For details about which sizes and weights of paper that can be folded, see User Guide of your device.
You can specify the fold-back position in the following settings. For details about how to adjust the fold-back position, see User Guide of your device.
Settings screen type: Standard
[System Settings] [Machine] [Fold/Booklet]
Settings screen type: Classic
[System Settings] [General Features]
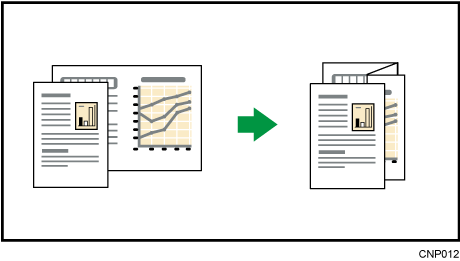
Makes two parallel folds, one of which faces in and the other facing out.
You cannot use Punch with this function depend on your machine.
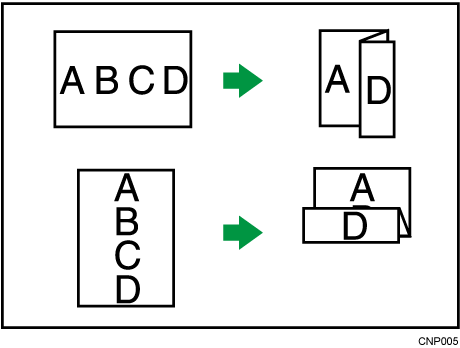
Original orientation and Z-fold position
Place all the originals in the ADF in the orientation in which they can be read normally. When placing the original on the exposure glass, keep the same orientation, but place the original facing downwards.
Original orientation
Placing the original on the exposure glass
Placing the original in the ADF
Direction of fold*1
Right fold


Bottom fold


*1 The above table shows Z-fold positions. The orientation of the paper does not indicate the orientation of delivery.
Press [Finishing].
Press [Folding Unit].
Select the folding direction, and then press [OK].
Place the originals, and then press [Start].


Folded copies that are delivered to the folding unit tray might be stacked with their folds open. If this happens, the position of the folds is unaffected and the copies will still be output in order. Stacked copies can be easily separated in the order they are delivered. To prevent their folded sections overlapping, configure the machine to deliver folded copies to the finisher upper tray or finisher shift tray.
You can staple Z-folded copies. For details about the number and the paper sizes of Z-folded copies that can be stapled, see User Guide of your device.
Even if you place different size originals in the ADF, appropriate size of copy paper can be automatically selected and Z-folded using the Mixed Sizes mode and Auto Paper Select function.
When you copy different size originals, such as A3 and A4 (11 × 17 and 81/2 × 11), use this function with Mixed Sizes mode. Copies of the large size original are Z-folded and will be the same size as the copy of the small size original. For details about the paper sizes you can use together, see User Guide of your device.
When using this function with 1 Sided → 2 Sided and Mixed Sizes modes, always ensure that the originals of each size are in even numbers. If you have an odd number of originals, insert blank sheets to adjust the total.
Depending on the Z-fold settings, you may not be able to use Rotate Copy.
For details about the number of Z-folded copies that can be stacked on the finisher trays, see User Guide of your device.
The capacity of the tray may vary depending on the condition of the paper.
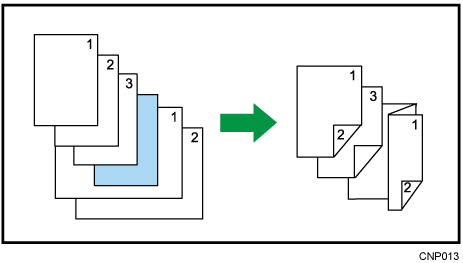
Applies a single, central fold to create two equal panels.

The key displayed in step 2 differs depending on the options that are installed.
When the multi-folding unit is installed: [Folding Unit]
When the booklet finisher is installed: [Finisher]
Press [Finishing].

Select [Folding Unit] or [Finisher].
Press [Half Fold].
Press [Change] if you select [Folding Unit] in step 2.
Select [Fold Orientation] and [Print Side].

Press [OK] twice.
Place the originals, and then press [Start].
The tray where folded copies are delivered differs depending on the options that are installed.
When using the internal multi-folding unit/the multi-folding unit: to the folding unit tray
When using the booklet finisher: to the finisher booklet tray
The following copier functions are not available when the Half Fold function is enabled:
Punch
Staple
If the Booklet or Magazine function is selected, the settings for those functions have priority.
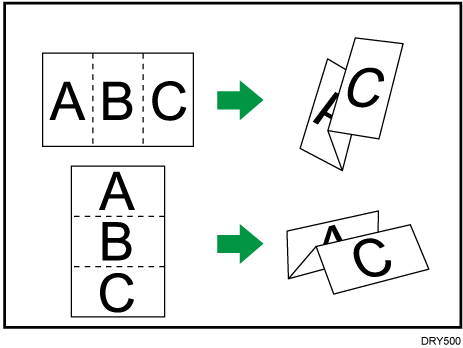
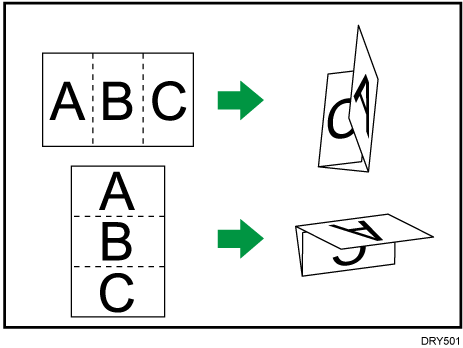
Applies two folds to create three equal panels (the first panel folding outward, the last panel folding inward).
Press [Finishing].
Press [Folding Unit].
Press [Letter Fold-out].
Press [Change].
Select [Fold Orientation] and [Open Orientation].
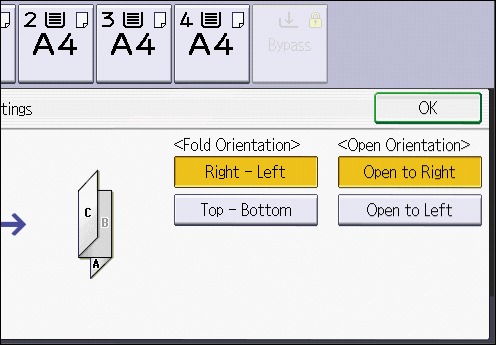
Press [OK] twice.
Place the originals, and then press the [Start] key.
The tray where folded copies are delivered differs depending on the options that are installed. For details, see User Guide of your device.
The following copier functions are not available when the Letter Fold-out function is enabled:
Punch
Staple
If the Booklet or Magazine function is selected, the settings for those functions have priority.
Applies two folds to create three equal panels (outer panels folding outward).
Press [Finishing].
Press [Folding Unit].
Press [Letter Fold-in].
Press [Change].
Select [Fold Orientation], [Open Orientation], and [Print Side].
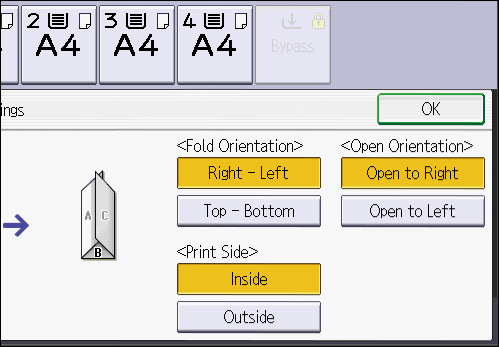
Press [OK] twice.
Place the originals, and then press the [Start] key.
The tray where folded copies are delivered differs depending on the options that are installed. For details, see User Guide of your device.
The following copier functions are not available when the Letter Fold-in function is enabled:
Punch
Staple
If the Booklet or Magazine function is selected, the settings for those functions have priority.