Use the multi bypass tray (Tray A) to use transparencies, translucent paper, and paper that cannot be loaded in the paper trays.
![]()
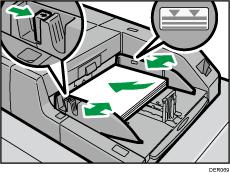
The maximum number of sheets you can load at the same time depends on paper type. Do not stack paper over the limit mark. For the maximum number of sheets you can load, see Recommended Paper Sizes and Types.
Check the paper edges are aligned at the left side.
When loading a low number of sheets, be sure not to squeeze the side fences in too tightly. If the side fences are squeezed too tightly against the paper, the edges may crease, the paper may misfeed, or if it weighs between 52.3–63.0 g/m2 (14.0–16.9 lb. Bond), it may wrinkle.
![]() Set the side fences to the paper size, and then square the paper and load it print side up.
Set the side fences to the paper size, and then square the paper and load it print side up.
Do not stack paper over the limit mark.
![]() Set the end fence.
Set the end fence.
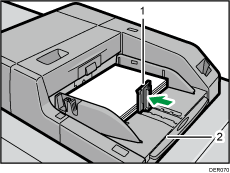
End fence
Extender
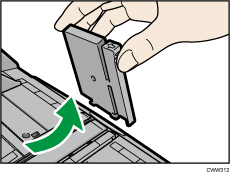
To remove the end fence, slide it to the right by pressing the stopper down.
![]() Press the elevator switch on the multi bypass tray (Tray A).
Press the elevator switch on the multi bypass tray (Tray A).
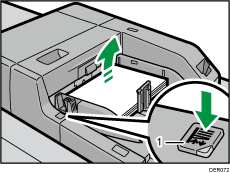
Elevator switch
The lamp of the elevator switch is blinking while the tray is going up, and keeps lit when it stops.
Press the elevator switch to move down the tray if you want to either add paper or remove jammed ones.
![]()
Pull the extender out when loading A4
 , 81/2 × 11 or larger sheets in the multi bypass tray (Tray A).
Letterhead paper must be loaded in a specific orientation. For details, see Loading Orientation-fixed Paper or Two-sided Paper.
You can load envelopes into the multi bypass tray (Tray A). Envelopes must be loaded in a specific orientation. For details, see Envelopes.
Specify the sizes of paper that are not automatically detected. For details about the sizes that can be detected automatically, see Recommended Paper Sizes and Types. For details about how to specify sizes, see Changing to a Size That Is Not Automatically Detected.