Each paper tray is loaded in the same way.
The wide LCT is identified as Tray 3, Tray 4, Tray 5, Tray 6, Tray 7, and Tray 8.
![]()
Check the paper edges are aligned at the left side.
When you use paper of Paper Weight 7 with a convex curl greater than 5 mm, paper of Paper Weight 8 with a convex curl greater than3 mm, or paper of Paper Weight 9 with a convex curl, paper jam may occur if the height of the stacked paper is less than 4 mm. To use paper in such condition, set the paper in the tray as follows:
Set as many as 5 to 10 more sheets than the number you intend to print
Correct the curl amount before setting the paper
Turn over the paper so the paper is with a concave curl.
![]() Check that paper in the paper tray is not being used, and then pull the tray carefully out until it stops.
Check that paper in the paper tray is not being used, and then pull the tray carefully out until it stops.
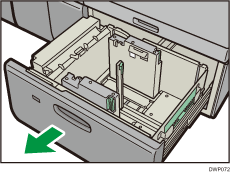
![]() Remove paper if loaded.
Remove paper if loaded.
![]() Release the end fence.
Release the end fence.
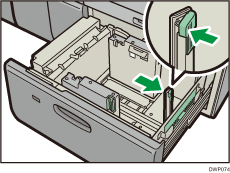
![]() While pressing the release button of the side fence, slide the side fence outward.
While pressing the release button of the side fence, slide the side fence outward.
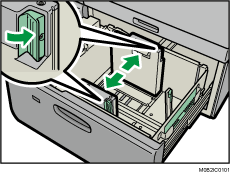
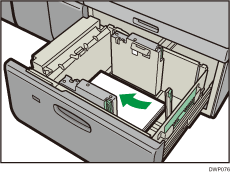
![]() Load paper by aligning the paper with the left side of the paper tray.
Load paper by aligning the paper with the left side of the paper tray.
Place paper with print side up.
Load a stack of paper about 5–10 mm (0.2–0.4 inches) high.
Make sure the paper rest on top of the supporting plates on both sides.
When you load paper that is 204 mm (8.04 inches) or shorter, remove the supporting plates from the bottom of the paper tray.
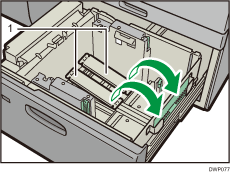
Supporting plates
Use the paper size indicators on the bottom of the paper tray to adjust the side fences the space provided by the side fences is somewhat wider than the paper size. Load paper so that both sides are on the auxiliary side fences.
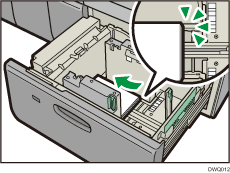
![]() Take the grip of the side fences with your fingers, and adjust the side fences to the paper size.
Take the grip of the side fences with your fingers, and adjust the side fences to the paper size.
Set the paper flush against the inner side fence.
Check that the scale numbers on the top of the side fences are roughly the same.
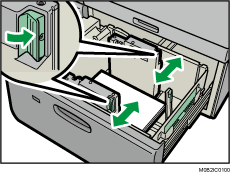
![]() Load additional sheets, if necessary.
Load additional sheets, if necessary.
Do not stack paper over the limit mark.
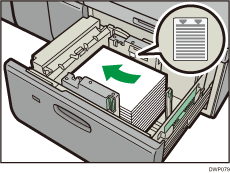
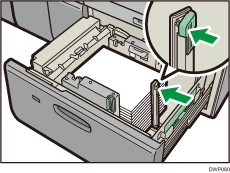
![]() Tightly fit the end fence to the loaded paper, and then re-lock the end fence again.
Tightly fit the end fence to the loaded paper, and then re-lock the end fence again.
Make sure there are no gaps between the paper and end fence.
![]() Carefully push the paper tray fully in until it clicks.
Carefully push the paper tray fully in until it clicks.
![]()
Various sizes of paper can be loaded in Trays 1, 2, and the wide LCT by adjusting the positions of side fence and end fence. For details, see Changing the Paper Size in Trays 1, 2, and the Wide Large Capacity Tray.
You can load envelopes in Trays 1, 2, and the wide LCT. When loading envelopes, place them in the correct orientation. For details, see Envelopes.
When using auto tray switching, covers, or slip sheets, the lamp on the front of the tray being used will stay lit until printing is complete. While the lamp is lit, paper cannot be replenished.
