The paper size setting is changed in the same way for each paper tray.
![]()
Check that the paper edges are aligned with the left side.
Pay attention to the following things when using the banner sheet tray of wide LCT:
Set one long-end fence between the paper size indicators under the bottom plate. If you set the end fence on the bottom plate, the end fence may collide with the upper part of the paper tray and fall over inside the machine. Contact your sales representative if the end fence falls over inside the machine.
Set the two short-end fences to the right and left of the paper size indicators on the bottom plate.
If you are not using the end fences, push them down and keep them to the side in the paper tray. If you keep the end fences in any other position, they may fall over inside the machine, or the end fences may interfere while you load paper.
Do not place the end fence under the bottom plate. When the bottom plate descends, the bottom plate may skew and break.
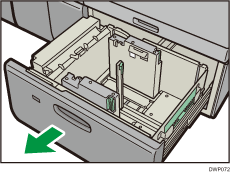
![]() Check that paper in the paper tray is not being used, and then pull the tray carefully out until it stops.
Check that paper in the paper tray is not being used, and then pull the tray carefully out until it stops.
![]() Remove paper if loaded.
Remove paper if loaded.
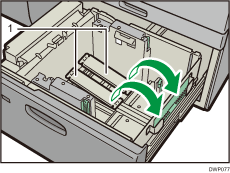
![]() Release the end fence.
Release the end fence.
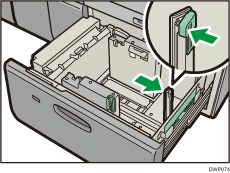
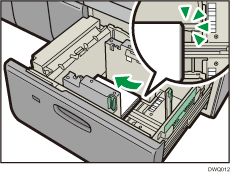
![]() While pressing the release button of the side fence, slide the side fence outward.
While pressing the release button of the side fence, slide the side fence outward.
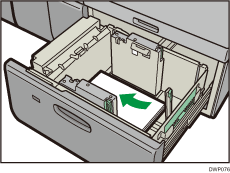
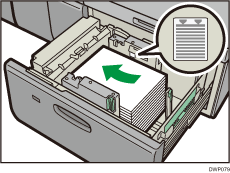
![]() Load paper by aligning the paper with the left side of the paper tray.
Load paper by aligning the paper with the left side of the paper tray.
Place paper with print side up.
Load a stack of paper about 5–10 mm (0.2–0.4 inches) high.
Make sure the paper rest on top of the supporting plates on both sides.
When you load paper that is 204 mm (8.04 inches) or shorter, remove the supporting plates from the bottom of the paper tray.
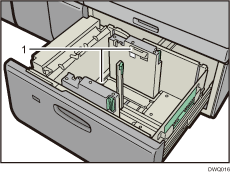
Supporting plates
Use the paper size indicators on the bottom of the paper tray to adjust the side fences the space provided by the side fences is somewhat wider than the paper size. Load paper so that both sides are on the auxiliary side fences.
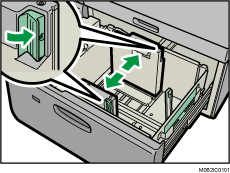
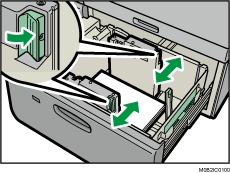
![]() Take the grip of the side fences with your fingers, and adjust the side fences to the paper size.
Take the grip of the side fences with your fingers, and adjust the side fences to the paper size.
Set the paper flush against the inner side fence.
Check that the scale numbers on the top of the side fences are roughly the same.
![]() Load additional sheets, if necessary.
Load additional sheets, if necessary.
Do not stack paper over the limit mark.
![]() Tightly fit the end fence to the loaded paper, and then re-lock the end fence again.
Tightly fit the end fence to the loaded paper, and then re-lock the end fence again.
Make sure there are no gaps between the paper and end fence.
![]() Carefully push the paper tray fully in until it clicks.
Carefully push the paper tray fully in until it clicks.
![]()
After sliding the paper tray in, make sure that the paper size is changed correctly on the [Top] screen. To display the [Top] screen, display the [Home] screen and press the
 icon at the upper right corner of the screen.
You can load envelopes in Trays 1, 2, and the wide LCT. When loading envelopes, place them in the correct orientation. For details, see Envelopes.
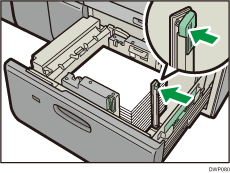
Do not push in the paper presser on the upper part of the side fence. If it is pushed in, return it to its original position by hand.
Paper presser
When you load paper that is 420.0 mm (16.54 inches) or wider in the banner sheet tray of the wide LCT, load it as follows:
Press the elevator switch to move the bottom plate down until the lamp goes out, and then open the cover and load the paper.
Hold the paper lengthwise and load it little by little.
If you load thin paper or coated paper, load it little by little. Press down on the paper while you load it so that the paper loaded in the bottom is not dragged.
If you load thick paper, load it little by little and align the side fence with the horizontal side of the paper.
Check that the paper is correctly positioned against the back of the paper tray and the label on which is printed the paper sizes for the paper tray.
When you load paper that is 420.0-559.9 mm (16.54–22.00 inches) wide, use two short-end fences.
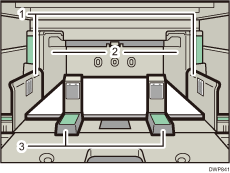
Side fence extension
Side fence
Short-end fences
When you load paper that is 560.0-700.0 mm (22.00–27.55 inches) wide, use one long-end fence.
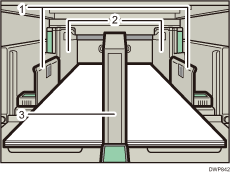
Side fence extension
Side fence
Long-end fences
When you load paper, load the paper and set the auxiliary side fence. Align the auxiliary side fence against the side of the paper that is higher than the side fence extension.
Adjust the side fences according to the corresponding instructions on the label attached to the tray.