![]() Press [Home] (
Press [Home] (![]() ) at the bottom of the screen in the center.
) at the bottom of the screen in the center.
![]() Press the [User Tools] icon (
Press the [User Tools] icon (![]() ).
).
![]() Press [Machine Features].
Press [Machine Features].
![]() Press [Maintenance].
Press [Maintenance].
![]() Press [Auto Color Calibration].
Press [Auto Color Calibration].
![]() Press [Start].
Press [Start].
To perform auto color calibration using the copy function, press [Start] in Copier Function. To perform auto color calibration using the printer function, press [Start] in Printer Function.
![]() Press [Start Printing].
Press [Start Printing].
![]() When using the printer function, select the item to calibrate, and then press [Start Printing].
When using the printer function, select the item to calibrate, and then press [Start Printing].
![]() Place the test pattern on the exposure glass, and then press [Start Scanning].
Place the test pattern on the exposure glass, and then press [Start Scanning].
![]()
The test pattern will not be read if it is set into the ADF.
The test pattern will be printed on an A4, 81/2
 11 size page. If these sheets are not available, A3 or B4 JIS (Japanese Industrial Standard) will be used. Make sure to check the paper set into the paper tray.
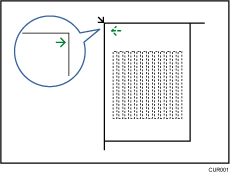
Set the test pattern in the following way:

Make sure to set the test pattern on the exposure glass, and then two or three white sheets, same size as the test pattern, above the test pattern.
