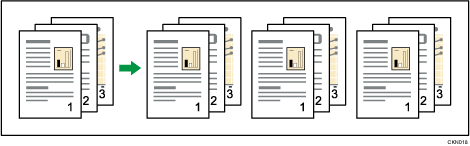
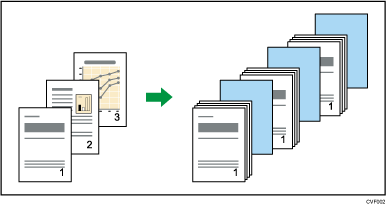
The machine assembles copies as sets in sequential order.
Sort/Shift Sort
Copies are assembled as sets in sequential order.
To use Shift Sort, a finisher or high capacity stacker is required. Each time the copies of one set or a job are delivered, the next copy is shifted to separate each set or job.
![]() Select the Sort function (
Select the Sort function (![]() ) under [Sort / Stack].
) under [Sort / Stack].
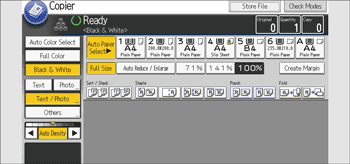
![]() Enter the number of copy sets using the number keys.
Enter the number of copy sets using the number keys.
![]() Place the originals.
Place the originals.
To confirm the type of finishing, press [Sample Copy].
![]() Press the [Start] key.
Press the [Start] key.
![]()
If you are copying from the exposure glass, a single copy of each original is made first. If the first copy set is acceptable, you can make the remaining copy sets by pressing the [
 ] key. The time required for copy sets to be delivered varies depending on the print settings.
If the memory becomes full during scanning, a message prompting you to choose whether or not to copy the scanned pages is displayed. If you select [Print], the specified number of copies of scanned pages are printed. Leave the originals that are to be scanned on the exposure glass or in the ADF. They will be copied once all of the scanned pages are printed. If you select [Clear Memory], the whole job is canceled.
When the number of copies exceeds capacity, copying stops. If this happens, remove copies from the tray to resume copying.
For details about the number of copy sheets that the output tray can accommodate, and paper sizes and orientations that can be shifted when delivered to the shift tray, see "Specifications for Finisher SR5050", "Specifications for Finisher SR5110", "Specifications for Booklet Finisher SR5060", "Specifications for Booklet Finisher SR5120", or "Specifications for High Capacity Stacker", Specifications.
You can change the settings for the Sort function under [Input / Output] in User Tools. For details, see "Input / Output", Preparation.
To specify whether or not sets are shifted, use the [Output/ Cstmz.] tab or the [Input / Output] setting in User Tools. For details, see "Shift tray off in sort/stack", Sort, or "Input / Output", Preparation.
Sample Copy
Use this function to check the copy settings before making a long copy run.
![]()
This function can be used only when the Sort function is selected.
![]() Select Sort and any other necessary functions, and then place the originals.
Select Sort and any other necessary functions, and then place the originals.
![]() Enter the number of copy sets with the number keys.
Enter the number of copy sets with the number keys.
![]() Press [Sample Copy].
Press [Sample Copy].
One copy set is delivered as a sample.
![]() If the sample is acceptable, press [Continue].
If the sample is acceptable, press [Continue].
The number of copies made is the number specified, minus one for the proof copy.
![]()
If you press [Suspend] after checking the results, you can change the copy settings. However, depending on the combination of functions, you may not be able to change some settings.
Changing the number of sets
You can change the number of copy sets during copying.
![]()
This function can be used only when the Sort function is selected.
![]() While “Copying...” is displayed, press the [Stop] key.
While “Copying...” is displayed, press the [Stop] key.
![]() Enter the number of copy sets with the number keys.
Enter the number of copy sets with the number keys.
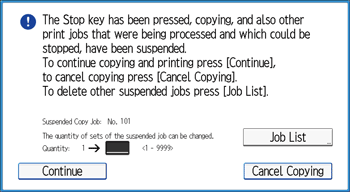
![]() Press [Continue].
Press [Continue].
Copying starts again.
![]()
The number of sets you can enter in Step 2 differs depending on when the [Stop] key is pressed.
When memory is full
If the amount of data of the scanned originals exceeds the capacity of memory, scanning is interrupted.
![]() Press the [Start] key.
Press the [Start] key.
![]() Continue copying following the instructions on the display.
Continue copying following the instructions on the display.
![]()
The number of pages that can be stored in memory is about 5000 pages of A4 (81/2 × 11) size originals. It depends on the type of originals or memory settings.
In the Sort function, you can complete scanning and copying by copying the scanned pages stored in memory until it becomes full, and then scanning and copying the remained originals.
Shift tray off in sort/stack
You can turn off the shift function when using the Sort or Stack function.
![]() Press [Output/ Customize Function/ Finisher].
Press [Output/ Customize Function/ Finisher].
![]() Press [Output/ Cstmz.].
Press [Output/ Cstmz.].
![]() Press [Sort/ Stack Shift Tray Off].
Press [Sort/ Stack Shift Tray Off].
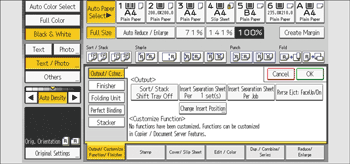
![]() Press [OK].
Press [OK].
Insert Separation Sheet
Use this function to have separation sheets inserted between sets or jobs.
Before using this function, select the tray for separation sheet under [Tray Paper Settings]. For details, see "Changing Tray Paper Settings", Preparation.
![]() Press [Output/ Customize Function/ Finisher].
Press [Output/ Customize Function/ Finisher].
![]() Press [Output/ Cstmz.].
Press [Output/ Cstmz.].
![]() Press [Insert Separation Sheet Per 1 set(s)] or [Insert Separation Sheet Per Job].
Press [Insert Separation Sheet Per 1 set(s)] or [Insert Separation Sheet Per Job].
![]() Press [OK].
Press [OK].
![]()
When [Insert Separation Sheet Per 1 set(s)] is selected, you can change the number of sets inserted between the separation sheets by pressing the [Change Insert Position].