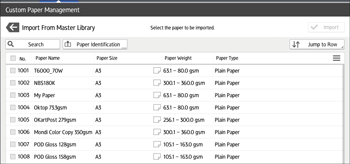
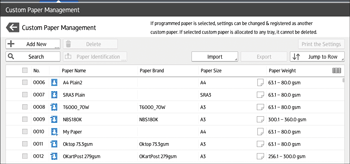
If the paper you want is not in the library's paper list or you don't know the name of the paper, use the following procedures:
Selecting the paper's type from the master library
The master library contains the optimum printing conditions not only for each commercially available paper but also for each type of paper.
Even if you don't know the brand name of a paper, you can register the paper as the custom paper by selecting a paper of the matching paper type and weight from the Master Library.
Manually specifying a paper's type and weight
You can register a custom paper by manually specifying its type and weight.
Selecting the paper's type from the master library
You can select the type of paper from the master library and register it as a custom paper.
![]()
Specify [Paper Type] and [Paper Weight] as the items to be displayed in the Custom Paper Management screen. For details about selecting the displayed items, see How to Use the [Custom Paper Management] Screen.
![]() Press [Tray Paper Settings] in the upper left corner of the screen.
Press [Tray Paper Settings] in the upper left corner of the screen.
![]() Press [CustomPaper Management].
Press [CustomPaper Management].
![]() Press [Import].
Press [Import].
![]() Select [From Master Library].
Select [From Master Library].
![]() Select the most appropriate combination of type and weight for your paper.
Select the most appropriate combination of type and weight for your paper.
If the paper you want to select is not displayed, use [Jump to Row], or scroll through the screen until the desired item is displayed.

![]() Press [Import].
Press [Import].
![]() Press [OK].
Press [OK].
![]() Press [Exit].
Press [Exit].
When selected, custom paper is imported from the Master Library.
![]() Press
Press ![]() .
.
![]() Press the [Home] (
Press the [Home] (![]() ) icon at the center bottom of the screen.
) icon at the center bottom of the screen.
![]()
You can check and change the settings of the registered custom paper such as the paper name setting on the [Custom Paper Management] screen. For details about modifying the custom paper, see Modifying a Custom Paper.
Manually specifying a paper's type and weight
![]() Press [Tray Paper Settings] in the upper left corner of the screen.
Press [Tray Paper Settings] in the upper left corner of the screen.
![]() Press [CustomPaper Management].
Press [CustomPaper Management].
![]() Press [Add New].
Press [Add New].

![]() Press [Paper Name].
Press [Paper Name].
![]() Enter the name of the paper.
Enter the name of the paper.
You can enter up to 38 half-width characters. You can register Different Custom Paper under the same name.
![]() Press [Paper Size].
Press [Paper Size].
![]() Select a paper size.
Select a paper size.
![]() Press [Paper Weight].
Press [Paper Weight].
![]() Specify the paper's weight.
Specify the paper's weight.
You can also specify [Paper Thickness].
![]() Press [Paper Type].
Press [Paper Type].
![]() Specify the paper type.
Specify the paper type.
![]() Specify other items, such as [Coated Paper Type], [Paper Color], [Prepunched], [Textured], [Apply Duplex], and [Apply Auto Paper Select] as necessary.
Specify other items, such as [Coated Paper Type], [Paper Color], [Prepunched], [Textured], [Apply Duplex], and [Apply Auto Paper Select] as necessary.
![]() Press [Save Paper].
Press [Save Paper].
The [Save Custom Paper] screen is displayed.
If you change [Paper Weight], [Paper Type], [Coated Paper Type], [Paper Color], [Prepunched], or [Textured] and press [OK], a message appears to notify you that [Advanced Settings] will be initialized. To apply the changes for those settings, select [Change]. To cancel the changes, select [Do not Change].
![]() Press [Save].
Press [Save].
![]() Press [Program].
Press [Program].
![]() Press [Exit].
Press [Exit].
Custom paper is saved under the smallest unregistered number.
![]() Press
Press ![]() .
.
![]() Press the [Home] (
Press the [Home] (![]() ) icon at the center bottom of the screen.
) icon at the center bottom of the screen.
![]()
If you want to use glossy paper, select [Coated: Glossy] or [Coated: High Gloss] for [Coated Paper Type]. If you want to use matte paper (including silk, dull, and satin paper), select [Coated: Matte] for [Coated Paper Type].
For details about custom paper settings, see Custom Paper Settings.
For details about [Advanced Settings], contact your machine administrator.
