Every paper tray is loaded in the same way.
In the following example procedure, paper is loaded into Tray 1.
![]()
When loading paper, pull the paper tray completely out from the machine and set the stack of paper straight down on the tray. Loading the paper from a diagonally downward direction may cause the machine to malfunction.
Be sure to select the correct paper size and feed direction using the paper size dial on the tray. Otherwise, the machine might be damaged, or printing problems might occur.
To use the paper size and feed direction other than those indicated on the paper size dial, set the dial to "
 ", and set the paper size using the control panel.
If you load paper whose size is not indicated on the paper size dial, you can specify the paper size in [Tray Paper Settings]. For details, see Changing Paper Size Settings.
Make sure the paper stack does not exceed the upper limit mark inside the paper tray. Excessive stacking can cause paper jams.
If paper jams occur frequently, flip the paper stack in the tray.
Do not mix different types of paper in the same paper tray.
After loading paper, specify the paper size using the control panel or paper size dial, and paper type using the control panel. When printing a document, specify the same paper size and type in the printer driver as specified on the machine.
Do not move the side paper guides and end paper guide forcefully. Doing so may damage the tray.
Do not slide the paper tray in forcefully when inserting the loaded tray into the machine. Otherwise, the side and end guides or the paper guide of the bypass tray might move.
When loading label paper, load it one by one.
![]() Pull out the paper tray carefully. Adjust the paper size dial to match the size and feed direction of paper in the paper tray.
Pull out the paper tray carefully. Adjust the paper size dial to match the size and feed direction of paper in the paper tray.
Tray 1
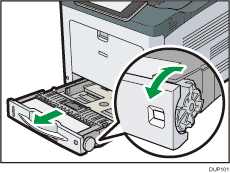
Tray 2
![]() Pull the tray carefully until it stops, lift the front side of the tray, and then pull it out of the machine.
Pull the tray carefully until it stops, lift the front side of the tray, and then pull it out of the machine.
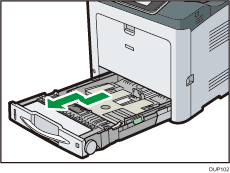
Place the tray on a flat surface.
![]() Pinch the clip on the side paper guide and slide it to match the paper size.
Pinch the clip on the side paper guide and slide it to match the paper size.
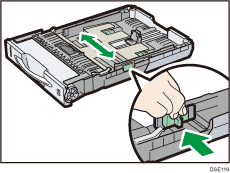
![]() Pinch the end guide and slide it inward to match the standard size.
Pinch the end guide and slide it inward to match the standard size.
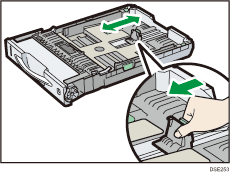
![]() When loading paper into tray 1, slide the two switches at the bottom of the tray according to the thickness of the paper.
When loading paper into tray 1, slide the two switches at the bottom of the tray according to the thickness of the paper.
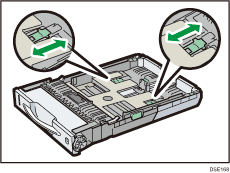
If the paper is heavier than 164 g/m2 (44 lb.), slide both switches into the rear (thick) position. If the paper is 163 g/m2 (43 lb.) or lighter, slide both switches into the forward (thin) position.
![]() Set the paper straight down on the paper source tray with its printing side facing up.
Set the paper straight down on the paper source tray with its printing side facing up.
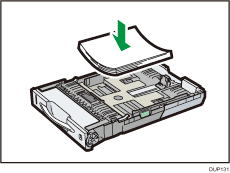
Make sure paper is not stacked higher than the upper limit (upper line) marked inside the tray.
Do not load the paper from a diagonally downward direction as shown in the figure below. Doing so may cause the machine to malfunction.
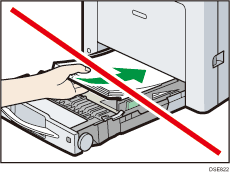
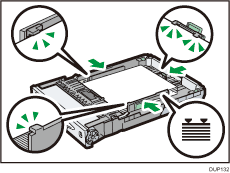
![]() Adjust the paper guides to close any gaps.
Adjust the paper guides to close any gaps.
Do not move paper loaded in the tray more than a few millimeters.
Moving the loaded paper excessively can cause damage to paper edges on the openings of the tray's lifting plate, resulting in sheets being folded or becoming jammed.
![]() Lift the front side of the tray, and then slide it into the machine carefully until it stops.
Lift the front side of the tray, and then slide it into the machine carefully until it stops.
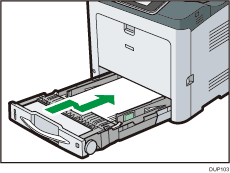
To avoid paper jams, make sure the tray is securely inserted.
![]()
When loading paper larger than A4
 or 81/2 × 11
 into Tray 1, extend the tray. For details, see When Loading Paper Larger than A4 or 81/2 × 11.
Letterhead paper must be loaded in a specific orientation. For details, see Loading Orientation-fixed Paper or Two-sided Paper.
You can load envelopes into Tray 1. Envelopes must be loaded in a specific orientation. For details, see Loading Envelopes.
