This section describes how to copy onto regular size and custom size envelopes.
Specify the thickness of the paper according to the weight of the envelopes you are printing on. For details about the relationship between paper weight and paper thickness and the sizes of envelopes that can be used, see "Supported Paper Sizes and Types", Paper Specifications and Adding Paper.
About handling envelopes, supported envelope types, and how to load envelopes, see Paper Specifications and Adding Paper for details.
You can load envelopes into the bypass tray or Tray 1. When copying onto envelopes loaded in Tray 1, select [Envelope] for the paper type under [Tray Paper Settings] in User Tools beforehand. For details, see "Tray Paper Settings", Connecting the Machine/System Settings.
When copying onto envelopes loaded in the bypass tray, follow the procedure below:
![]()
The Duplex function cannot be used with envelopes. If the Duplex function is specified, press [1 Sided
 2 Sided] to cancel the setting.
![]() Load the envelopes face down in the bypass tray.
Load the envelopes face down in the bypass tray.
The bypass tray is automatically selected.
![]() Press the paper size selection button.
Press the paper size selection button.
![]() Specify the envelope size.
Specify the envelope size.
To copy onto regular size envelopes, press [Regular Size], and then select the envelope size.
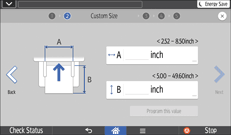
To copy onto custom size envelopes, press [Custom Size], and then specify the horizontal and vertical length of the envelope.

![]() Select [Envelope] for the paper type.
Select [Envelope] for the paper type.
![]() Select [Thick Paper 1] or [Thick Paper 2] as the paper thickness.
Select [Thick Paper 1] or [Thick Paper 2] as the paper thickness.
![]() Confirm the print side of original and paper, and then press [OK].
Confirm the print side of original and paper, and then press [OK].
You can switch the place where the original is set by pressing [ADF] or [Exposure Glass].
![]() Press [
Press [![]() ].
].
![]() Place the originals, and then press [Start].
Place the originals, and then press [Start].
If the screen for confirming the original orientation is displayed, check the orientation, and then press [Start] again.
