This section gives you various details about and recommendations concerning envelopes.
![]()
Do not use window envelopes.
Envelopes, especially those with glue on their flaps, may stick together. Fan the envelopes to separate them before loading. If the envelopes still stick together, load them one by one. For the envelope types that can be used with this printer, see Supported Paper.
Misfeeds might occur depending on the length and shape of the flaps.
Load envelopes with their flaps closed. However, load envelopes with their flaps open when the flaps are opened at the time of purchase.
When loading envelopes with their flaps open, specify a custom size. You can print with a standard envelope size setting only when printing on envelopes with their flaps closed.
Before loading envelopes, press down on them to remove any air from inside, flattening out all four edges. If they are bent or curled, flattening their leading edges (the edge going into the printer) by running a pencil or ruler across them.
In copier mode
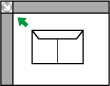
When copying onto envelopes, load them according to the applicable orientation shown below.
Orientation of envelopes |
Exposure glass |
Tray 1 |
Bypass tray |
|---|---|---|---|
Side-opening envelopes
|
|
|
|

When loading envelopes, specify the envelope size and thickness. For details, see "Copying onto Envelopes", Copy.
In printer mode
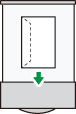
When printing onto envelopes, load them according to the applicable orientation shown below:
Types of envelopes |
Tray 1 |
Bypass tray |
|---|---|---|
Side-opening envelopes
|
|
|
When loading envelopes, select "Envelope" as the paper types using both [Tray Paper Settings] and printer driver and specify the thickness of envelopes. For details, see "Printing on Envelopes", Print.
Recommended envelopes
For information about recommended envelopes, contact your local dealer.
For details about the sizes of envelopes you can load, see Supported Paper Sizes and Types.
![]()
Load only one size and type of envelope at a time.
The Duplex function cannot be used with envelopes.
To get better output quality, it is recommended that you set the leading- and tailing-edge print margin to at least 15 mm (0.6 inches), and the left and right margins to at least 10 mm (0.4 inches) each.
Output quality on envelopes may be uneven if parts of an envelope have differing thicknesses. Print one or two envelopes to check print quality.
Flatten out prints if they are creased or curled.
Check the envelopes are not damp.
High temperature and high humidity conditions can reduce print quality and cause envelopes to become creased.
Depending on the environment, copying or printing on envelopes may wrinkle them even if they are recommended.
Certain types of envelopes might come out creased, dirtied, or misprinted. If you are printing a solid color on an envelope, lines may appear where the overlapped edges of the envelope make it thicker.