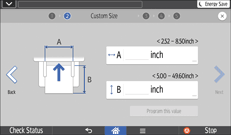
Paper that has a horizontal length of 64.0–216.0 mm (2.52–8.50 inches) and a vertical length of 127.0–1260.0 mm (5.0–49.60 inches) can be fed in from the bypass tray.
![]() Load the paper face down in the bypass tray.
Load the paper face down in the bypass tray.
The bypass tray is automatically selected.
![]() Press the paper tray selection key.
Press the paper tray selection key.
![]() Make sure that [Bypass Tray] is selected, and then press [Change].
Make sure that [Bypass Tray] is selected, and then press [Change].
![]() Press [Custom Size].
Press [Custom Size].
![]() Press the edit box of the horizontal size, specify the size with the number keys, and then press [Done].
Press the edit box of the horizontal size, specify the size with the number keys, and then press [Done].

![]() Press the edit box of the vertical size, specify the size with the number keys, and then press [Done].
Press the edit box of the vertical size, specify the size with the number keys, and then press [Done].
![]() Press [Next].
Press [Next].
![]() Specify the type of the paper.
Specify the type of the paper.
![]() Specify the thickness of paper.
Specify the thickness of paper.
![]() Confirm the print side of original and paper, and then press [OK].
Confirm the print side of original and paper, and then press [OK].
You can switch the place where the original is set by pressing [ADF] or [Exposure Glass].
![]() Press [
Press [![]() ].
].
![]() Place the originals, and then press [Start].
Place the originals, and then press [Start].
If the screen for confirming the original orientation is displayed, check the orientation, and then press [Start] again.
![]() When the copy job is finished, press [Reset] to clear the settings.
When the copy job is finished, press [Reset] to clear the settings.
![]()
You can register a custom paper size by pressing [Program this value] after Step 6. To recall a registered custom size, press [Programmed Size] on Step 4, and then select the size you want to use.
