You can install a 250-sheet paper feed unit or a 500-sheet paper feed unit.
![]()
|
![]()
Do not place the printer directly on the floor.
![]() Turn the printer off and unplug the power cord.
Turn the printer off and unplug the power cord.
![]() Remove the packaging from the paper feed unit.
Remove the packaging from the paper feed unit.
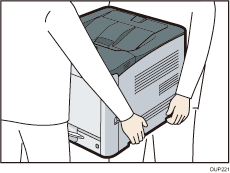
![]() Lift the printer using the inset grips on both sides of the printer.
Lift the printer using the inset grips on both sides of the printer.
Be sure two people lift the printer.

When moving the printer, do not hold the following parts. Doing so may cause them to break.
The handle on the standard paper feed tray
The underside of the bypass tray
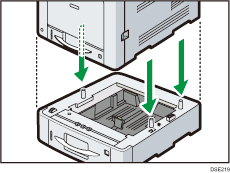
![]() There are three upright pins on the optional paper feed unit. Align them with the holes on the underside of the printer, and then carefully lower the printer.
There are three upright pins on the optional paper feed unit. Align them with the holes on the underside of the printer, and then carefully lower the printer.

![]() Plug in the power cord, and then turn on the printer.
Plug in the power cord, and then turn on the printer.
![]() Print the configuration page to confirm that the unit was attached correctly.
Print the configuration page to confirm that the unit was attached correctly.
![]()
To check whether the optional paper feed unit was correctly attached, print the configuration page, and check "Attached Equipment" on the configuration page. If the unit was attached correctly, "Tray 2" will appear.
For information about printing the configuration page, see Test Printing.
If the optional paper feed unit was not installed properly, repeat the procedure from the beginning. If it cannot be installed correctly even after trying the installation a second time, contact your sales or service representative.
To use the paper feed unit, configure the printer options in "Accessories" in the printer driver. For details about opening "Accessories", see "Configuring Option Settings for the Printer", Setup Guide.
