This is an authentication method for limiting access to functions according to a user code. The same user code can be used by multiple users.
For details about specifying user codes, see "Registering a User Code", Configuring and Managing the Printer.
For details about specifying the user code on the printer driver, see the driver Help.
![]() Log in as the machine administrator from the control panel.
Log in as the machine administrator from the control panel.
![]() Press [System Settings].
Press [System Settings].
![]() Press [Administrator Tools].
Press [Administrator Tools].
![]() Press [
Press [![]() Next].
Next].
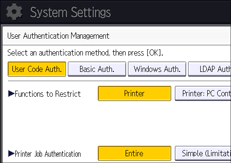
![]() Press [User Authentication Management].
Press [User Authentication Management].

![]() Select [User Code Auth.].
Select [User Code Auth.].
If you do not want to enable user authentication, select [Off].
![]() In "Functions to Restrict", select the functions that you want to restrict.
In "Functions to Restrict", select the functions that you want to restrict.
The selected functions are subject to User Code authentication. User Code authentication is not applied to the functions not selected.
For details about limiting available functions for individuals or groups, see Limiting Available Functions.
![]() To specify printer job authentication, select an item other than [Printer: PC Control] for "Functions to Restrict".
To specify printer job authentication, select an item other than [Printer: PC Control] for "Functions to Restrict".
If you do not want to specify printer job authentication, proceed to Step 13.
![]() Select the “Printer Job Authentication” level.
Select the “Printer Job Authentication” level.
For a description of the printer job authentication levels, see Printer Job Authentication.
If you select [Entire] or [Simple (All)], proceed to Step 13.
If you select [Simple (Limitation)], proceed to Step 10.
![]() Press [Change] for "Limitation Range".
Press [Change] for "Limitation Range".
![]() Specify the range in which [Simple (Limitation)] is applied to "Printer Job Authentication".
Specify the range in which [Simple (Limitation)] is applied to "Printer Job Authentication".
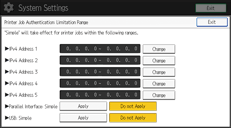
You can specify the IPv4 address range to which this setting is applied. Also, you can specify whether or not to apply the setting to the parallel and USB interfaces.
![]() Press [Exit].
Press [Exit].
![]() Press [OK].
Press [OK].
![]() Press [Exit].
Press [Exit].
A confirmation message appears. If you press [Yes], you will be automatically logged out.