If you want to scan only a part of a custom size original, select [Partial Scan] as the scan size.
To display the partial scan setting screen, on the initial scanner screen, press [Scan Settings] > [Scan Size] > [Partial Scan].
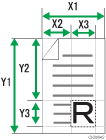
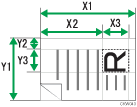
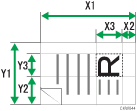
To scan part of an original, measure Original Size (X1 and Y1), Start Position (X2 and Y2), and Scan Area (X3 and Y3) on the front side of the original, and then enter those values on the partial scan setting screen.
Measuring methods differ depending on where the original is placed and the orientation it is placed in. For details about how to measure Original Size (X1 and Y1), Start Position (X2 and Y2), and Scan Area (X3 and Y3) correctly, see "How to measure sizes".
How to measure sizes
Orientation and placement of original |
Measuring method for scanning the "R" section |
|---|---|
In the |
|
In the |
|
In the |
|
Scan settings on the partial scan setting screen
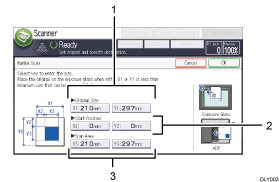
Original Size (X1 and Y1)
Specify the original's entire size.
Enter the actual values in [X1] and [Y1] while referring to "How to measure sizes", and then press [
 ].
].Start Position (X2 and Y2)
Specify the scanning start position.
Enter the actual values in [X2] and [Y2] while referring to "How to measure sizes", and then press [
].Scan Area (X3 and Y3)
Specify sizes of the area you want to scan.
Enter the actual values in [X3] and [Y3] while referring to "How to measure sizes", and then press [
].
![]()
For details about how to place originals, see Setting of Original Feed Type.