If you load a paper size that is not selected automatically, specify the paper size using the control panel.
![]() Press [Home] (
Press [Home] (![]() ) at the bottom of the screen in the center.
) at the bottom of the screen in the center.
![]() Flick the screen to the left, and then press the [User Tools] icon (
Flick the screen to the left, and then press the [User Tools] icon (![]() ).
).
![]() Press [Tray Paper Settings].
Press [Tray Paper Settings].
![]() Select a tray from [Tray Paper Size: Tray 2] to [Tray Paper Size: Tray 4] for which you want to change the paper size.
Select a tray from [Tray Paper Size: Tray 2] to [Tray Paper Size: Tray 4] for which you want to change the paper size.
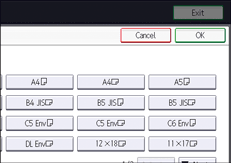
![]() Select the loaded paper size, and then press [OK].
Select the loaded paper size, and then press [OK].
![]() Press [User Tools] (
Press [User Tools] (![]() ) on the top right of the screen.
) on the top right of the screen.
![]() Press [Home] (
Press [Home] (![]() ) at the bottom of the screen in the center.
) at the bottom of the screen in the center.
![]()
For details about paper sizes selected automatically, see Recommended Paper Sizes and Types.
If you want to print on paper that is selected automatically after printing on a paper size that is not selected automatically, you must return the setting to [Auto Detect]. Reload the paper, and select [Auto Detect] in Step 5.