You can switch Screens 1 and 2 described in this section by flicking the screen up or down.
1
No. |
Icon |
Description |
|---|---|---|
1 |
|
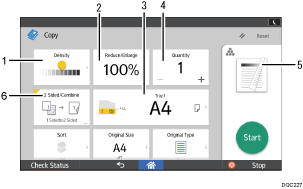
You can adjust the density of the overall original in nine steps. Specify the density by touching the |
2 |
|
You can reduce or enlarge images. |
3 |
|
You can specify the paper tray containing the paper you want to copy to. |
4 |
|
You can specify the numbers of copies to be made. Press a number to enter the number of copies using the keyboard. You can also specify the number of copies by pressing [ |
5 |
|
Preview prints change according to the settings you make. |
6 |
|
You can combine two 1-sided originals or one 2-sided original to one side of a sheet. The machine selects a reproduction ratio automatically and copies the originals onto a single sheet of copy paper. |
2
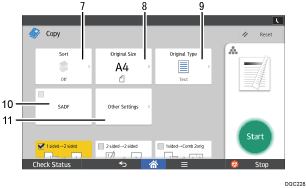
No. |
Icon |
Description |
|---|---|---|
7 |
|
You can sort copies as a set in sequential order. |
8 |
|
You can specify the size of the original when copying custom size originals. |
9 |
|
You can select an original type that is suitable for your originals. |
10 |
|
You can divide an original that has many pages and scan it in smaller batches while copying it as a single document. To do this, place several pages of the original in the ADF. |
11 |
|
You can find other settings. |
Functions registered in [Customize Function: Copier] appear under [Other Settings].

