This section explains the functions of the print job screen.
Press the [Printer] icon on the [Home] screen, and then press the [Print Jobs] tab. The screen to select a type of print job and User ID appears.
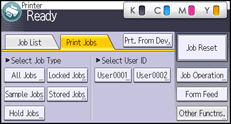
Press a type of print job or User ID to display the list of print jobs.
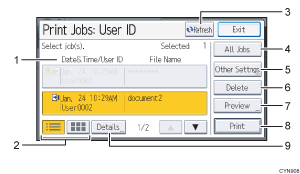
Date&Time, User ID, and File Name display
Date and Time displays the time at which the print job was stored in the printer.
User ID displays the user's ID set by the printer driver.
File Name displays the name of the file. However, "****" is shown instead of the file name for a Locked Print file.
List/Thumbnail
Switches between list view and thumbnail view.
[Refresh]
Updates the contents of the screen.
[All Jobs]
Selects all jobs of the same type.
[Other Settings]
Use this to change the preset print time for a Hold Print job or the password to a Locked/Stored Print job.
[Delete]
Deletes the selected job.
[Preview]
Previews the first page of the selected job.
[Print]
Prints the selected job.
[Details]
Displays the detailed information of the selected job.
![]()
If a large number of print jobs are stored in the printer, processing may slow temporarily,
depending on which functions are used.