This section explains how to identify the machine's interface and connect the machine according to the network environment.
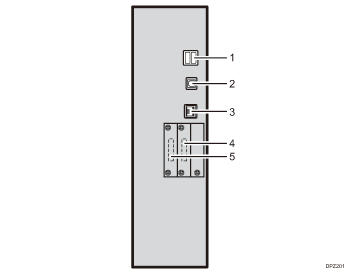
USB Host Interface
Port for connecting a USB interface cable or USB interface device
Use this interface to connect the machine to a card authentication device, or external keyboard.
Gigabit Ethernet port
Port for using a 1000BASE-T, 100BASE-TX, or 10BASE-T cable
Use this interface to connect the machine to a network.
If you use an Ethernet interface cable that supports 1000BASE-T, set [Ethernet Speed] to [Auto Select: Enable 1Gbps] in [Interface Settings] in [System Settings].
Slot A
Install an optional interface board in this slot.
The slot can accommodate one of the following interface boards:
IEEE1284 interface board: Required if you want to connect an IEEE 1284 cable to this machine for printing.
Wireless LAN interface unit: Required if you want to connect this machine to a wireless LAN. When installed in Slot A, this unit allows you to connect the machine to an IEEE 802.11 a or IEEE 802.11 b/g wireless LAN.
Slot B
Install the optional Copy Connector.
Copy Connector (optional): Required if you want to connect this machine to a sub-machine in order to use the connect copy function.
![]()
The slot can contain one module only: You can install one IEEE 1284 interface board, one Wireless LAN interface unit, or one USB Device Server Option at a time in this slot.
The Gigabit Ethernet port and Wireless LAN interface unit cannot be used simultaneously. If the optional Wireless LAN interface unit is installed, you need to set [LAN Type] to [Wireless LAN] in [Interface Settings] in [System Settings].
Related topics
Connecting to the Gigabit Ethernet InterfaceConnecting to the Extra Gigabit Ethernet Interface with the USB Device Server Option
Connecting a Device to the Machine's USB Host Interface
Connecting to the USB (Type B) Interface
Connecting to the IEEE 1284 Interface
Connecting to the Wireless LAN Interface