Every paper tray is loaded in the same way.
In the following example procedure, paper is loaded into Tray 1.
![]()
If a paper tray is pushed vigorously when putting it back into place, the position of the tray's side fences may slip out of place.
When loading a low number of sheets, be sure not to squeeze the side fences in too tightly. If the side fences are squeezed too tightly against the paper, the edges may crease or the paper may misfeed.
![]() Pull the tray carefully until it stops, lift the front side of the tray, and then pull it out of the machine.
Pull the tray carefully until it stops, lift the front side of the tray, and then pull it out of the machine.
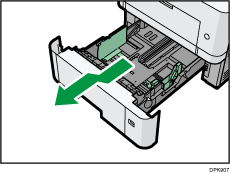
Place the tray on a flat surface.
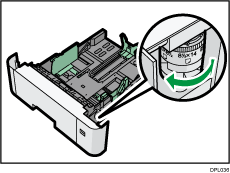
![]() Adjust the paper size dial to match the size and feed direction of paper in the paper tray.
Adjust the paper size dial to match the size and feed direction of paper in the paper tray.
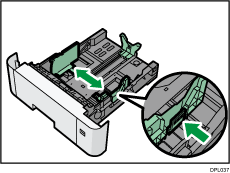
![]() Squeeze the clip on the side paper guide and slide it to match the paper size.
Squeeze the clip on the side paper guide and slide it to match the paper size.
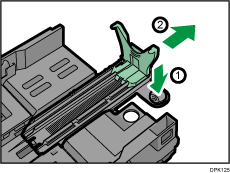
![]() Squeeze the end guide and slide it inward to match the standard size.
Squeeze the end guide and slide it inward to match the standard size.
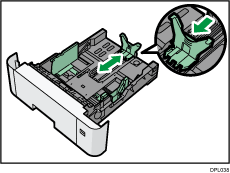
When loading paper that is larger than A4![]() or 81/2 × 11
or 81/2 × 11![]() , push the button, and then pull the end guide out to match the paper size.
, push the button, and then pull the end guide out to match the paper size.
![]() Load the new paper stack print side down.
Load the new paper stack print side down.
Make sure paper is not stacked higher than the upper limit (upper line) marked inside the tray.
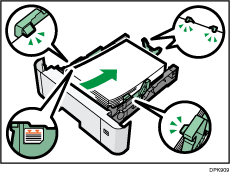
![]() Adjust the paper guides to close any gaps.
Adjust the paper guides to close any gaps.
Do not move paper loaded in the tray more than a few millimeters.
Moving the loaded paper excessively may cause damage to paper edges on the openings of the tray's lifting plate, resulting in sheets being folded or becoming jammed.
![]() Lift the front side of the tray, and then slide it into the machine carefully until it stops.
Lift the front side of the tray, and then slide it into the machine carefully until it stops.
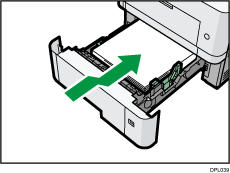
To avoid paper jams, make sure the tray is securely inserted.
![]()
Letterhead paper must be loaded in a specific orientation. For details, see Loading Orientation-fixed Paper or Two-sided Paper.
You can load envelopes in Trays 2–5. When loading envelopes, place them in the correct orientation. For details, see Envelopes.
