![]()
|
Front
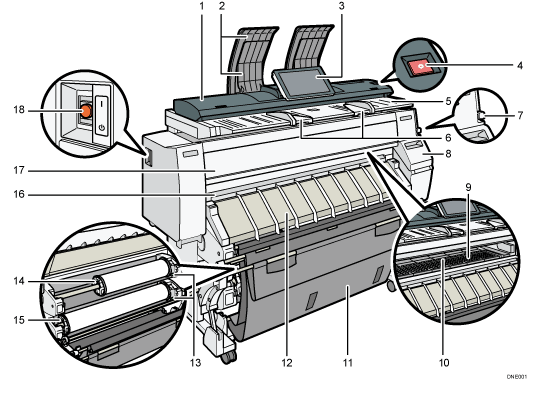
Original cover
Open to clear jammed originals.
Original stacker
Originals are stacked here.
Control panel
See Guide to the Names and Functions of the Machine's Control Panel.
[Scanner Stop] key
Use if originals are feeding in slanted, or to cancel scanning while an original is feeding in.
Original table
Place originals here scanning side down.
Original guide
Set to the width of your originals.
Paper holding lever
This lever holds paper that is inserted into the paper input location or the paper bypass location. Use this lever to copy or print from the bypass location, or to remove misfed paper.
Cartridge cover
Open to replace print cartridges.
Platen
Paper is sucked down and prevented from floating. Clean this area if the back of the printouts becomes dirty.
See Cleaning the Platen.
Paper bypass location
Load paper here when you copy or print from the paper bypass location. Load paper print side up.
Output basket
The delivered paper is stacked here. Change the mode of the basket according to the size of the paper.
Paper input location cover
Open to load the paper roll onto the paper input location or to remove misfed paper.
Rewind button
Press this button to load the paper roll or to remove misfed paper.
Paper Input Location 1
Load a paper roll here.
Paper Input Location 2
Load a paper roll here.
Paper output location
The printouts are delivered here.
Front cover
This is the cover of the paper bypass location. Open this cover to copy or print from the paper bypass location, to remove misfed paper, or to clean the platen.
Main power switch
To operate the machine, the main power switch must be on. If it is off, turn the switch on.
Rear
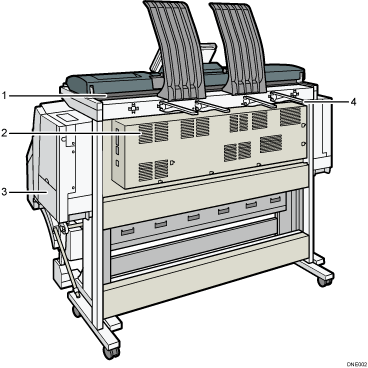
Original exit
Originals are delivered here.
Vents
Prevent overheating.
Ink collector unit cover
Open this cover to replace the ink collector unit. Ink used for maintenance collects in the ink collector unit.
Original output guide
Stacks originals delivered to the rear output.
![]()
The fan inside the machine near the vents may continue running to cool the machine. For details, see "When Other Messages Appear", Troubleshooting.