The machine automatically detects the original size and then selects an appropriate reproduction ratio based on the paper size you select.
![]()
You cannot use the paper bypass location with this function.
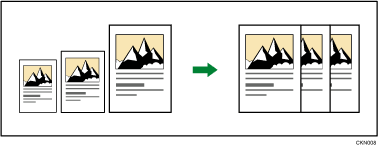
This is useful to copy different size originals to the same size paper.
To ensure the print result you require is produced, specify the original orientation before using Auto Reduce / Enlarge. Make sure that the original orientation setting matches the actual orientation of your original. For details, see Original Orientation.
The original sizes and orientations you can use with this function are as follows:
![]() (mainly Europe)
(mainly Europe)
A0![]() , A1
, A1![]()
![]() , A2
, A2![]()
![]() , A3
, A3![]()
![]() , A4
, A4![]()
![]() , B1 JIS
, B1 JIS![]() , B2 JIS
, B2 JIS![]()
![]() , B3 JIS
, B3 JIS![]()
![]() , B4 JIS
, B4 JIS![]()
![]()
![]() (mainly North America)
(mainly North America)
Engineering
E (34 × 44)
 , D (22 × 34)
 , C (17 × 22), B (11 × 17), A (81/2 × 11)
Architecture
E (36 × 48)
, D (24 × 36), C (18 × 24), B (12 × 18), A (9 × 12)Others
81/2 × 12
, 81/2 × 13, 81/2 × 14, 11 × 14, 11 × 15, 12 × 141/2, 30 × 21, 30 × 42
![]() When Using the Copy Application
When Using the Copy Application
About how to use the application's screen, see "[Copy] Screen".
![]() When Using the Copier (Classic) Application
When Using the Copier (Classic) Application
![]() Press [Auto Reduce / Enlarge].
Press [Auto Reduce / Enlarge].
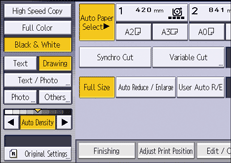
![]() Select the paper size.
Select the paper size.
![]() Place the original, and start scanning.
Place the original, and start scanning.
![]()
For details about the base point, see Reducing or Enlarging Originals.